KubeSphere 服务网格基于Istio,将微服务治理和流量管理可视化。它拥有强大的工具包,包括熔断机制、蓝绿部署、金丝雀发布、流量镜像、链路追踪、可观测性和流量控制等。KubeSphere 服务网格支持代码无侵入的微服务治理,帮助开发者快速上手,Istio 的学习曲线也极大降低。KubeSphere 服务网格的所有功能都旨在满足用户的业务需求。
kubesphere安装Istio
登录控制台
kubesphere已经更新到4.2.0版本,Istio已经解耦出来,作为扩展组件安装,可以直接从控制台扩展中心安装,可参考官方文档:安装扩展组件 - KubeSphere,这里不再赘述。
由于我的kubesphere是3.3.2版本,此版本集成了Istio,在控制台修改一下参数就可以自动安装:
登录控制台,左上角点击平台管理-集群管理:
在定制资源定义,搜索clusterconf:
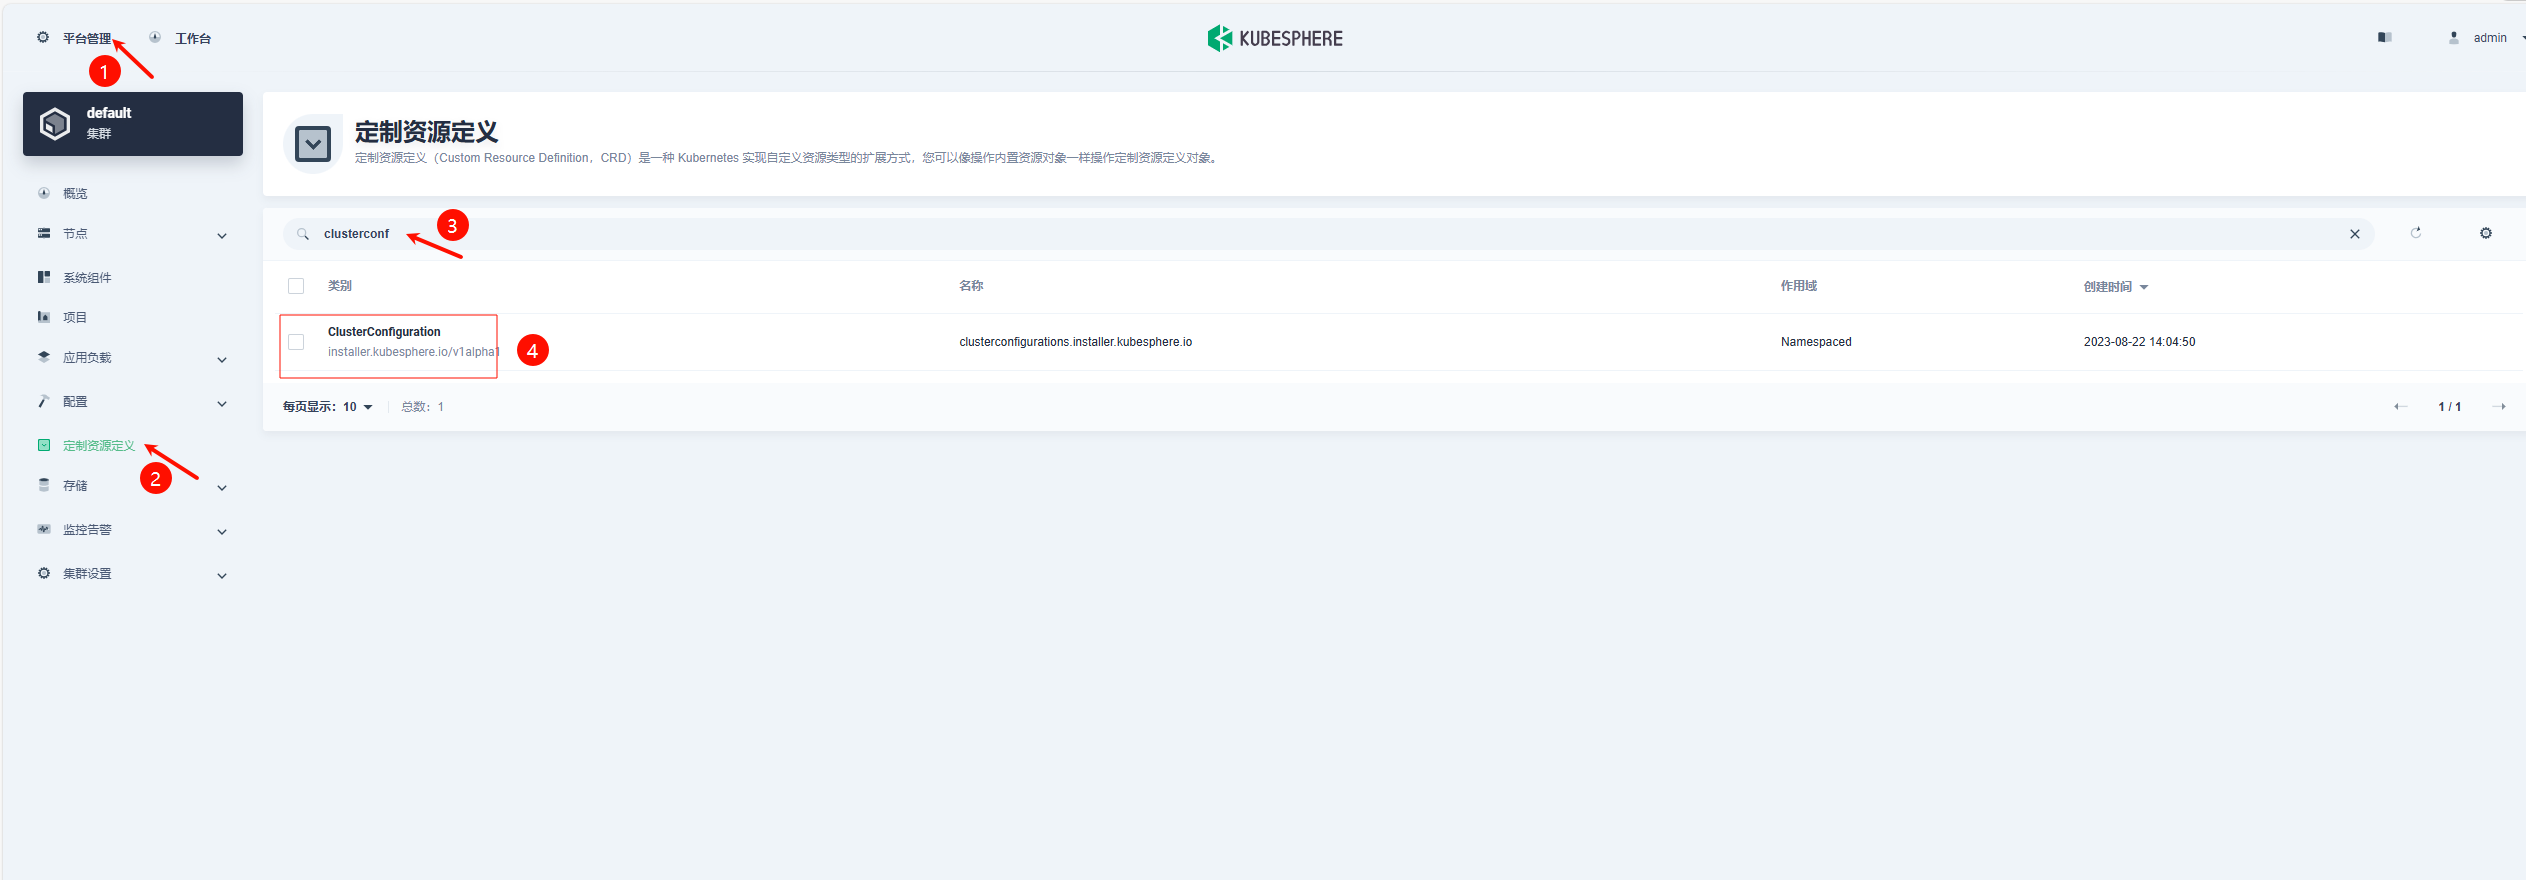
点进这个ClusterConfiguration之后:

末尾servicemesh修改参数:
1 | servicemesh: |

确定保存后,即可检查Istio组件的安装过程:
1 | kubectl logs -n kubesphere-system $(kubectl get pod -n kubesphere-system -l 'app in (ks-install, ks-installer)' -o jsonpath='{.items[0].metadata.name}') -f |
安装完成后,日志输出如下:
1 | Waiting for all tasks to be completed ... |
这就代表完成了Istio的安装及初始化。不需要理会这个原始密码,重新登录还是要用已经更改的密码。
验证Istio组件安装情况
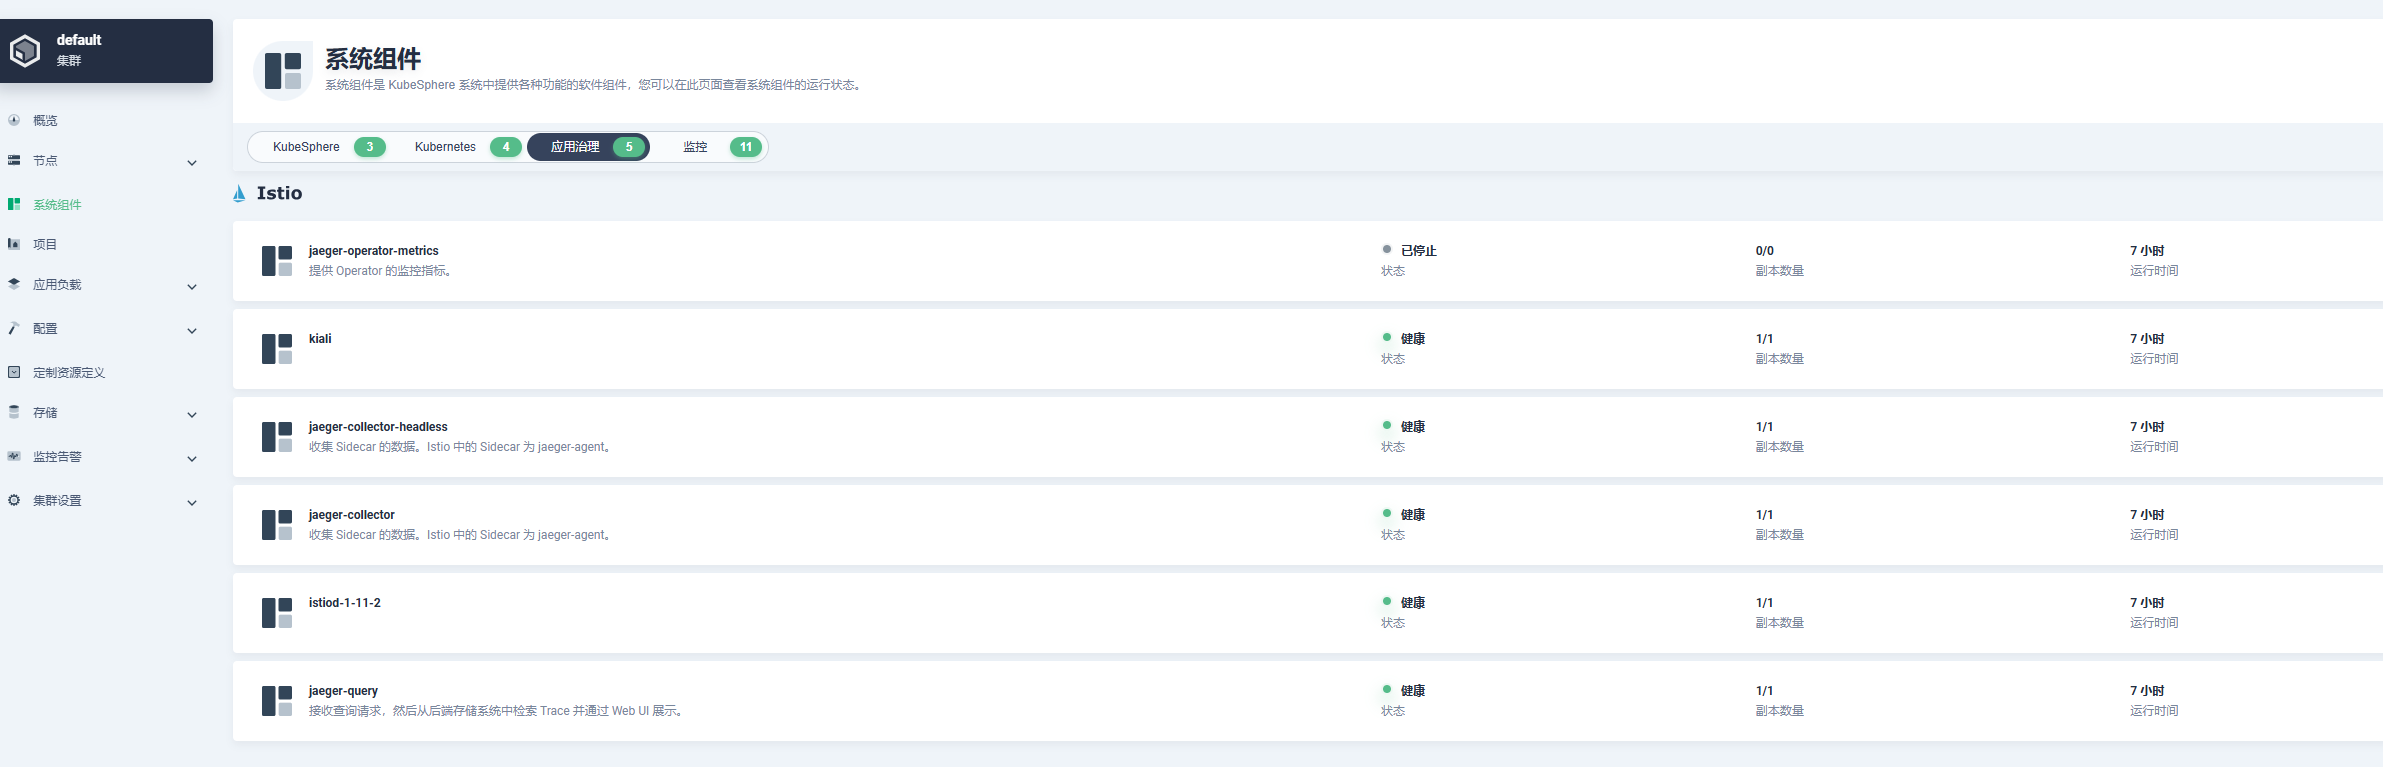
在WebUI可以看到:
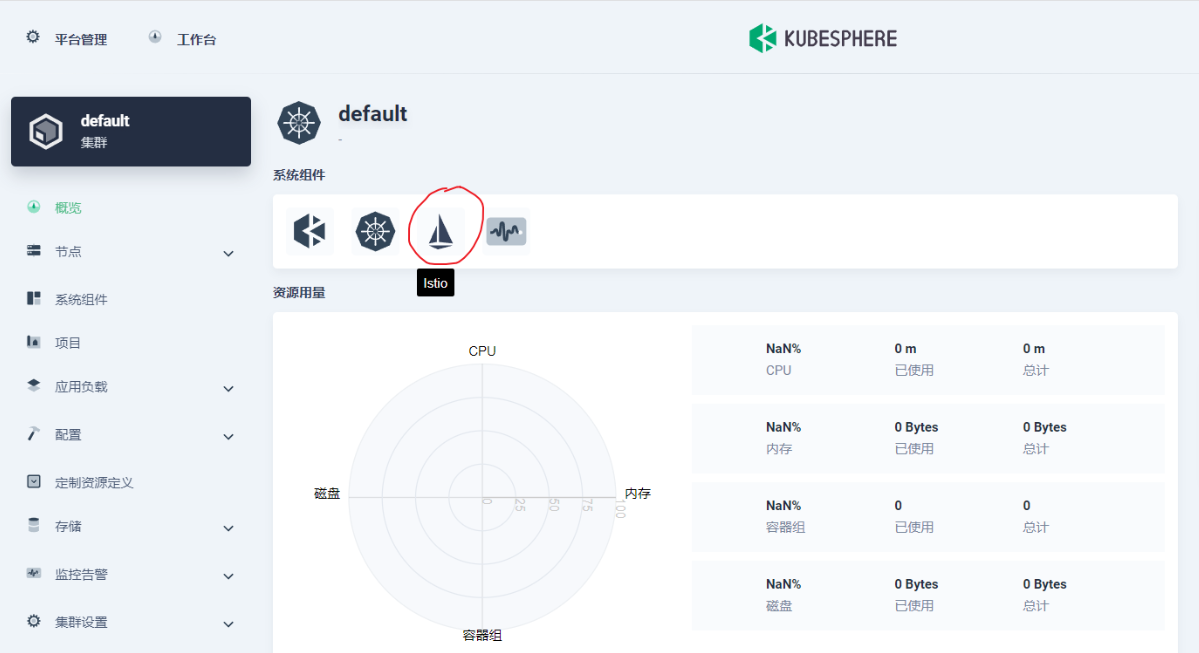
系统组件中已经出现了Istio组件。但是点进去发现:
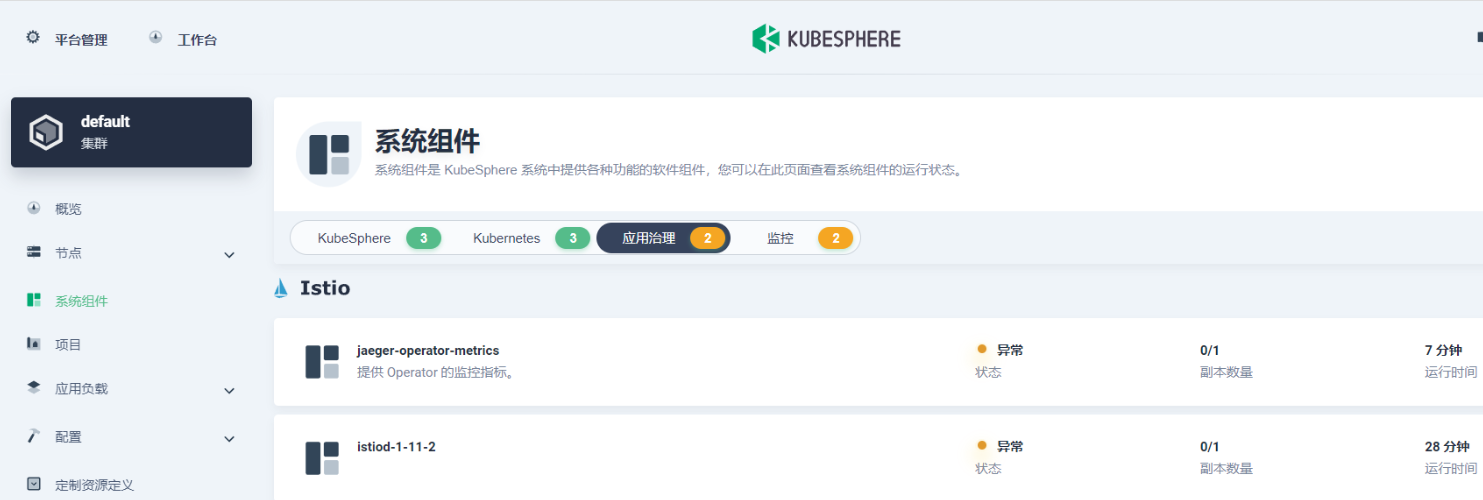
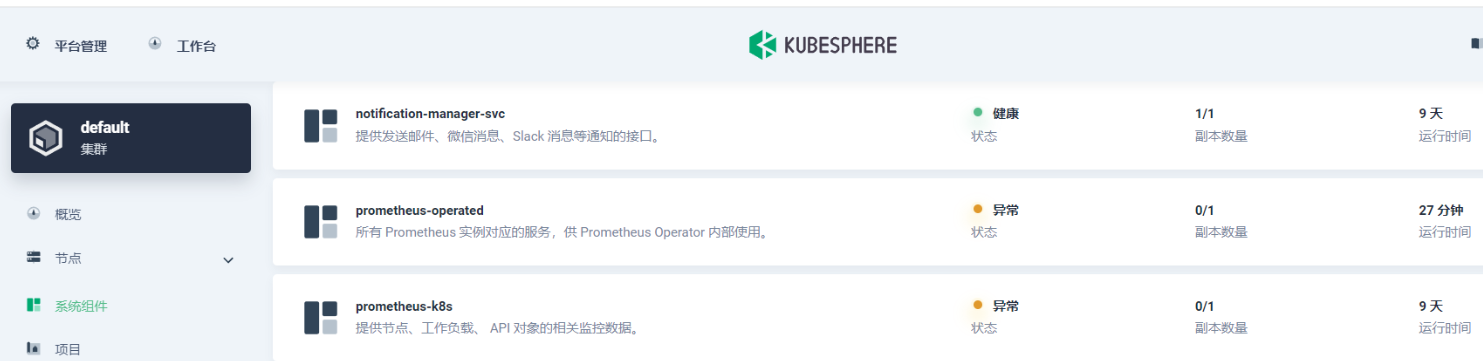
此时不但Istio异常,连带之前正常的Prometheus也一并异常了:
等待一段时间,等他拉取镜像,启动容器即可。
我的是能直接启动成功,有人反馈说容易一直卡在容器创建中,一直启动不了
看pod的events如下:
1 | Events: |
出现了网络没有认证通过的问题,根据报错日志,基本上确定是Calico的问题。
解决:把/etc/cni/net.d/目录下的calico-kubeconfig和10-calico.conflist文件移到另一个目录下备份,然后重启机器刷新Calico的配置。
等待容器启动完成即可。
自制应用
kubesphere的服务网格功能是在企业空间的自制应用里使用的,所以我们先要创建企业空间,然后把项目加到企业空间里,再创建一个自制应用,这个自制应用就是我们部署的整个系统,然后再把各个微服务通过标签加入到这个自制应用里。
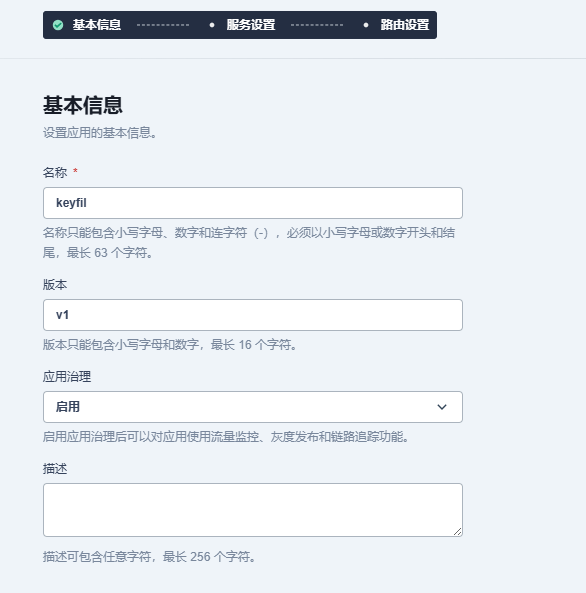
创建自制应用
基本信息
要启用应用治理才可以使用Istio功能
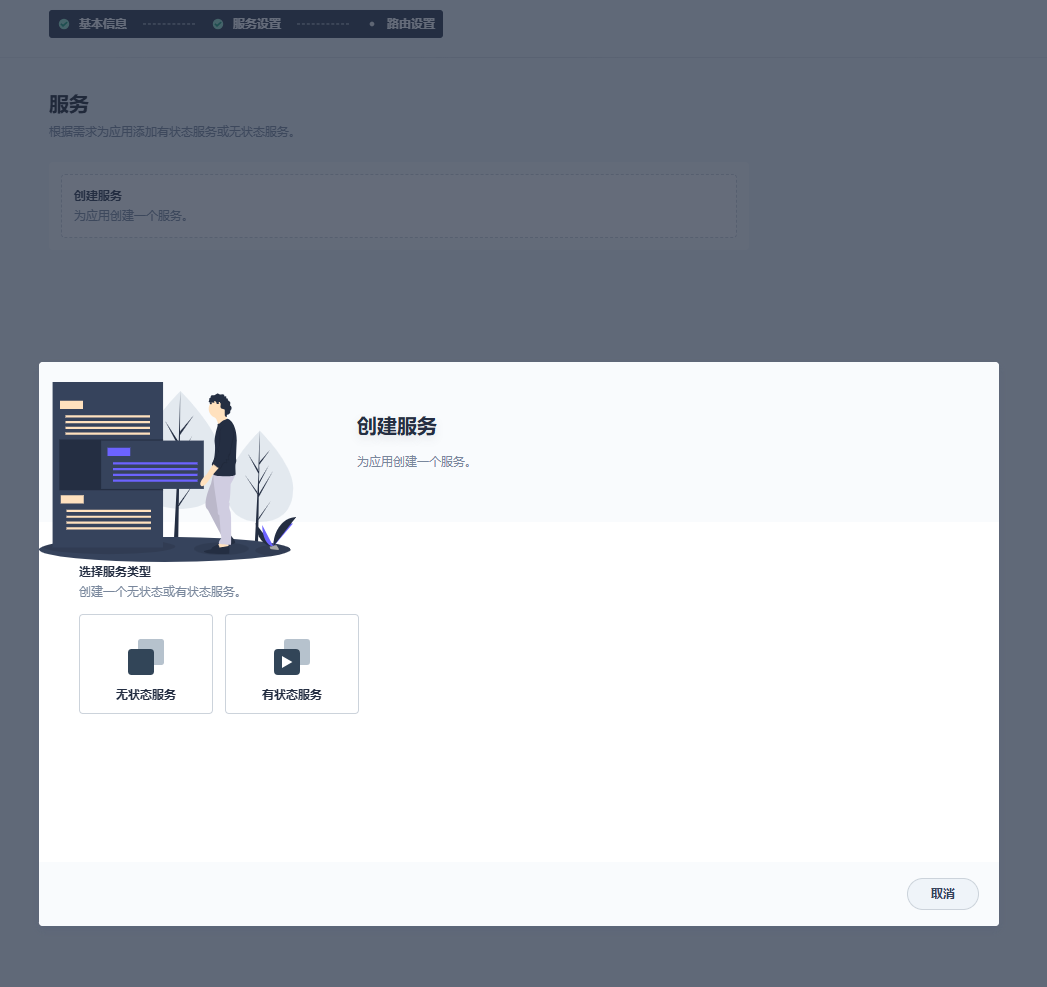
服务设置
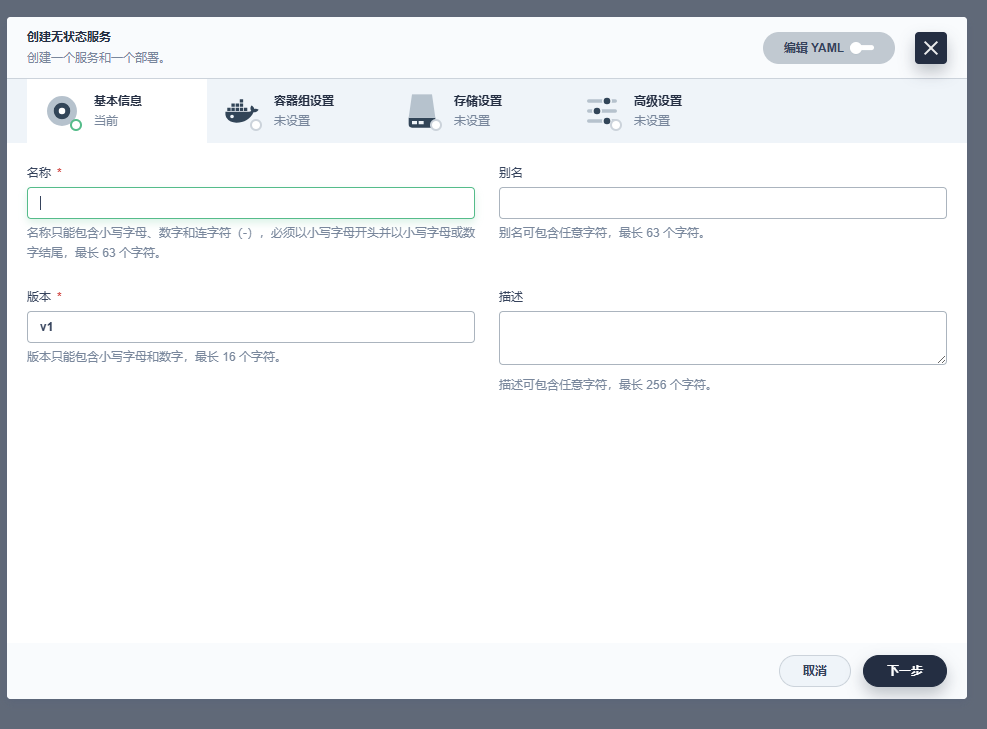
无状态服务为deployment,有状态服务为StatefulSet
填名称,镜像,存储等等信息
路由设置

注:这里只创建了Ingress,这样是访问不了集群内部的,需要启用网关,用nodeport的方式会有一个nodeport
把这个域名解析到任意一个k8s节点,然后就可以域名+nodeport的方式访问:
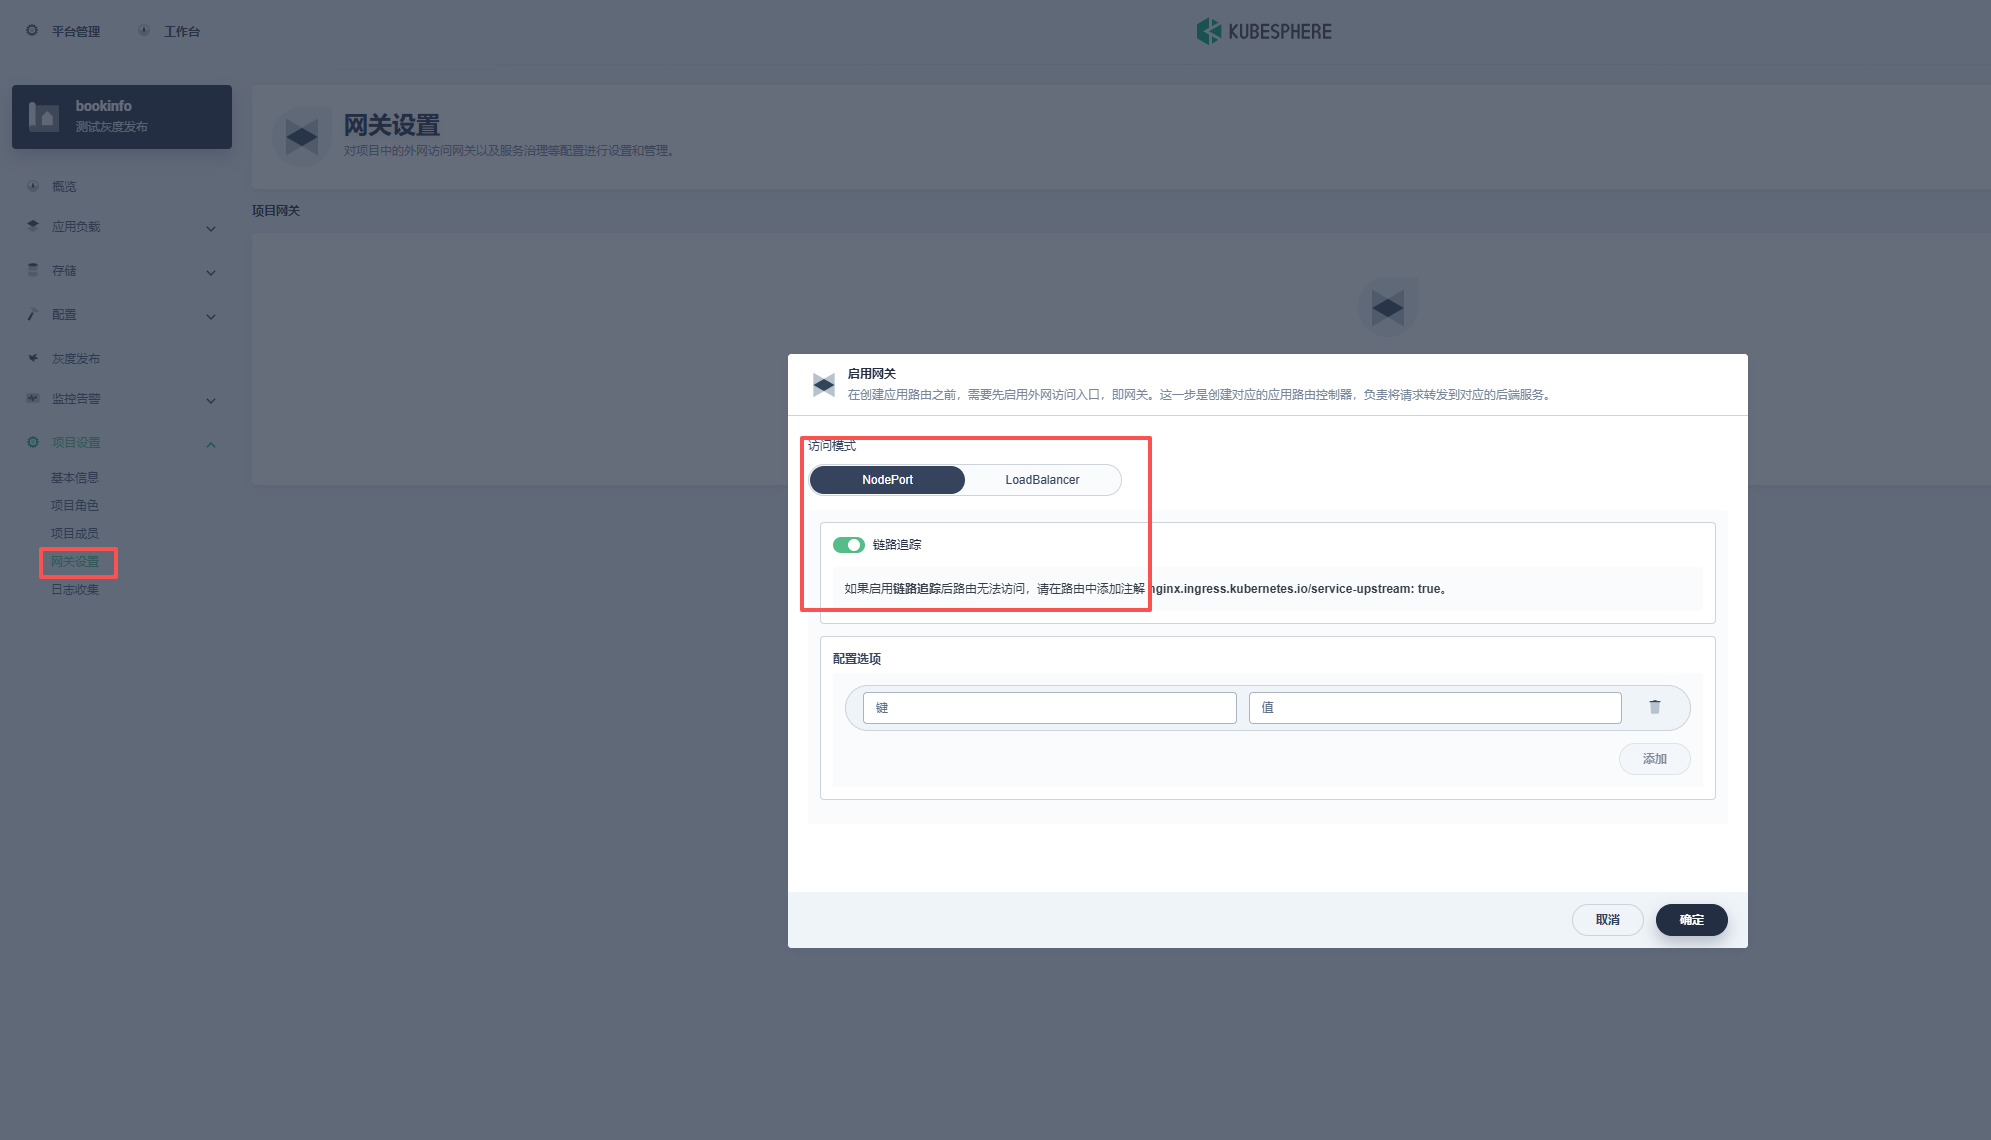
或者如果部署了ingress-nginx-controller的话:
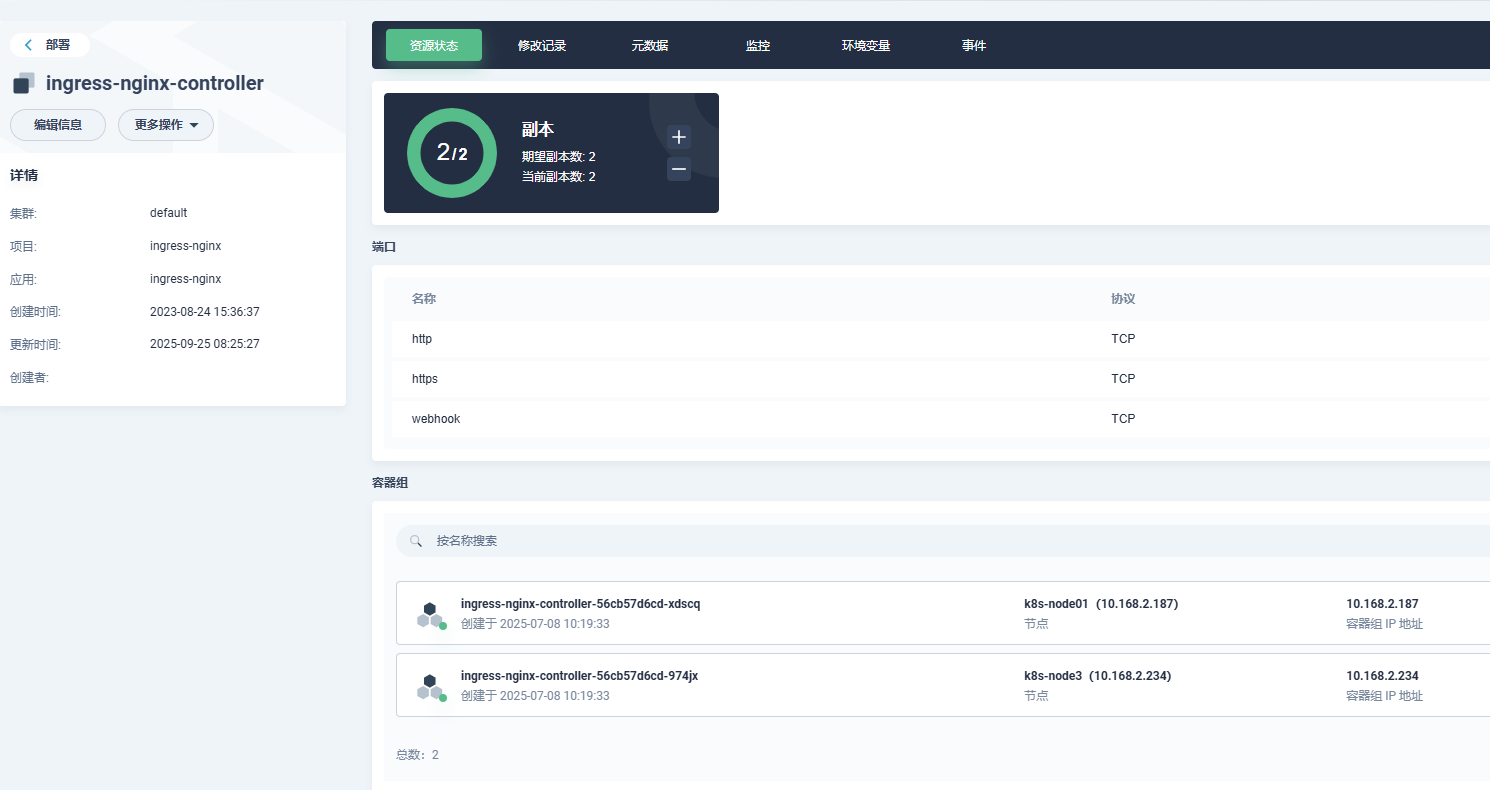
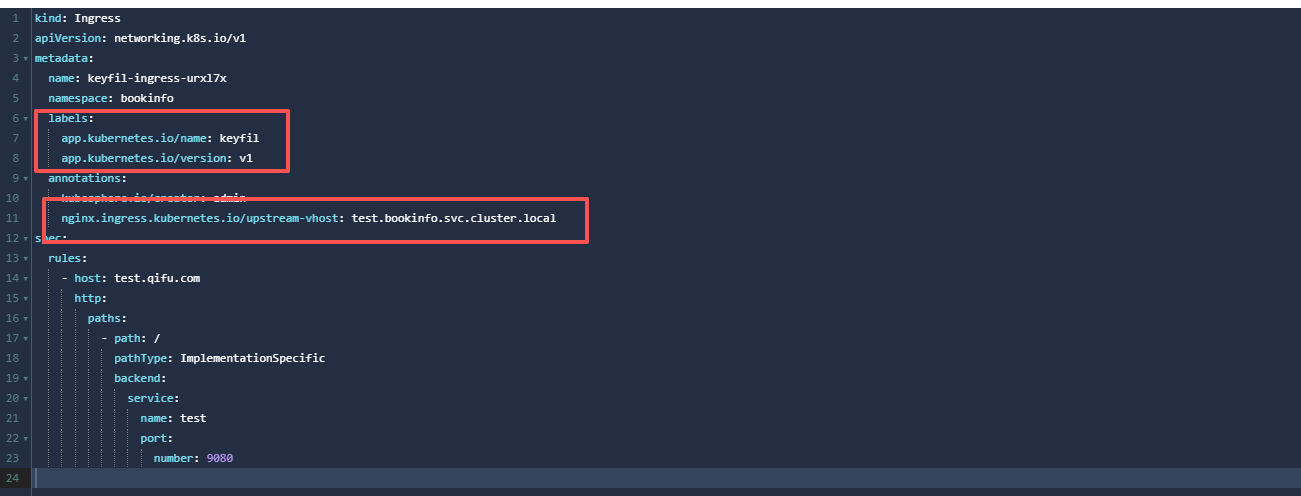
在ingress里加入ingressClassName: nginx
1 | kind: Ingress |
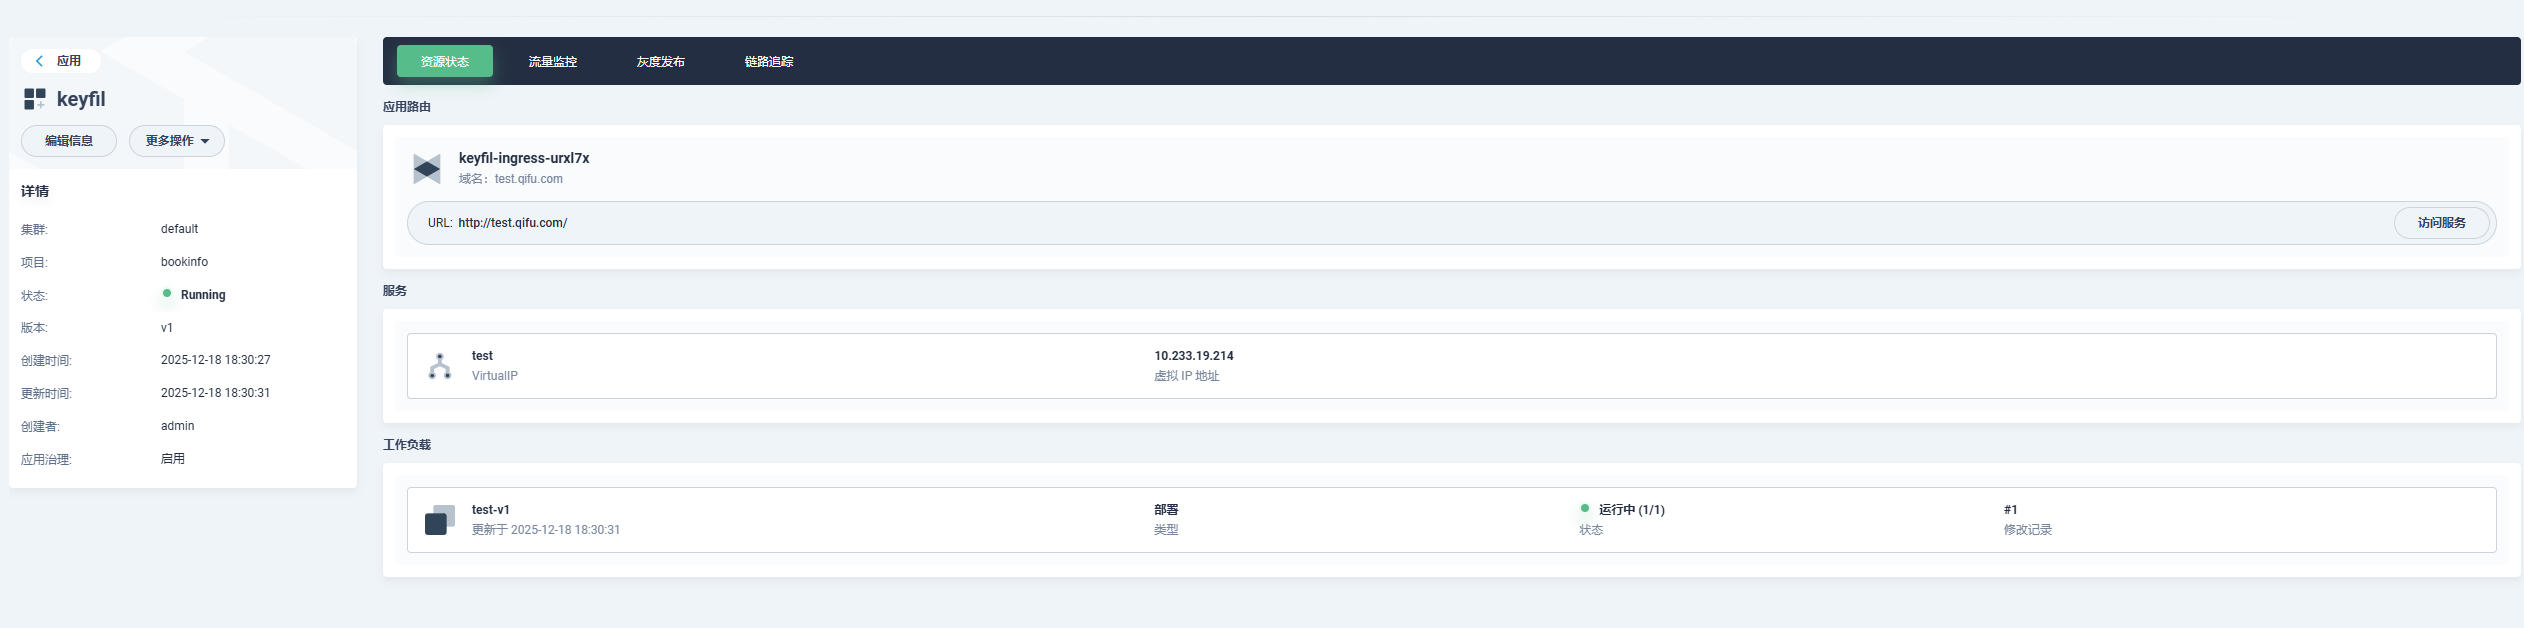
就可以直接用域名访问
创建完成
这样创建的deploy,svc,StatefulSet,Ingress等等都会自动加入匹配此自制应用的标签以及注解:
Ingress:
svc:
deploy:

已运行资源加入自制应用
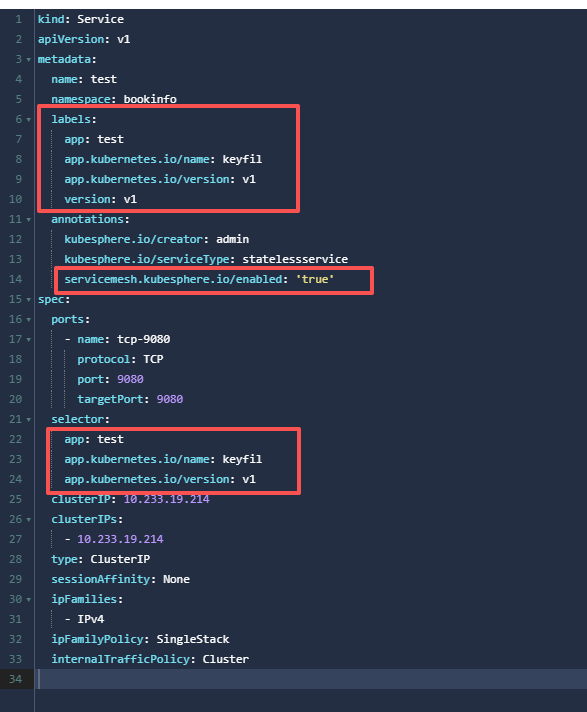
但是由于我们之前已经在运行的微服务,并没有这些标签,所以我们需要在已经存在的资源加入这些标签及注解,以加入此自制应用来使用Istio功能。
- Deployment 有
appversion这两个 label;Service 有appLabel;且 Deploy 与 service 的 App Label 一致,等于 Service Name(Istio 需要) - 在一个应用内,所有资源需要有这两个标签 app.kubernetes.io/name=, app.kubernetes.io/version=(Application 需要)
- Deployment Name 为 Service Name 后面加 v1;如 Serevice 为 nginx, deployment 为 nginx-v1
- Deployment Template 中有相应 Annotation (Istio Sidecar 自动注入需要)
1 | template: |
5.Service/Deployment 有相应 Annotation (KubeSphere CRD Controller 会自动将 Service 同步为 Virtual Service/DestinationRules,CRD controller 需要)
1 | # Service |
(注:已创建的deployment的selector修改不了,只能把yaml文件复制出来,把原deployment删了再根据yaml创建新的)
即:
1 | deployment需要加: |
Ingres-nginx注入sidecar容器
Istio有自己的网关ingress-gateway,但是配置Gateway在Kubesphere没法可视化,所以还是使用可以可视化的ingress-nginx,需要在ingress-nginx的deployment注入sidecar容器以及在Ingress的注解加上nginx.ingress.kubernetes.io/upstream-vhost: $SERVICE.$NAMESPACE.svc.cluster.local,然后通过Ingress来访问就可以正常使用Istio的功能。
注入sidecar:
1 | spec: |
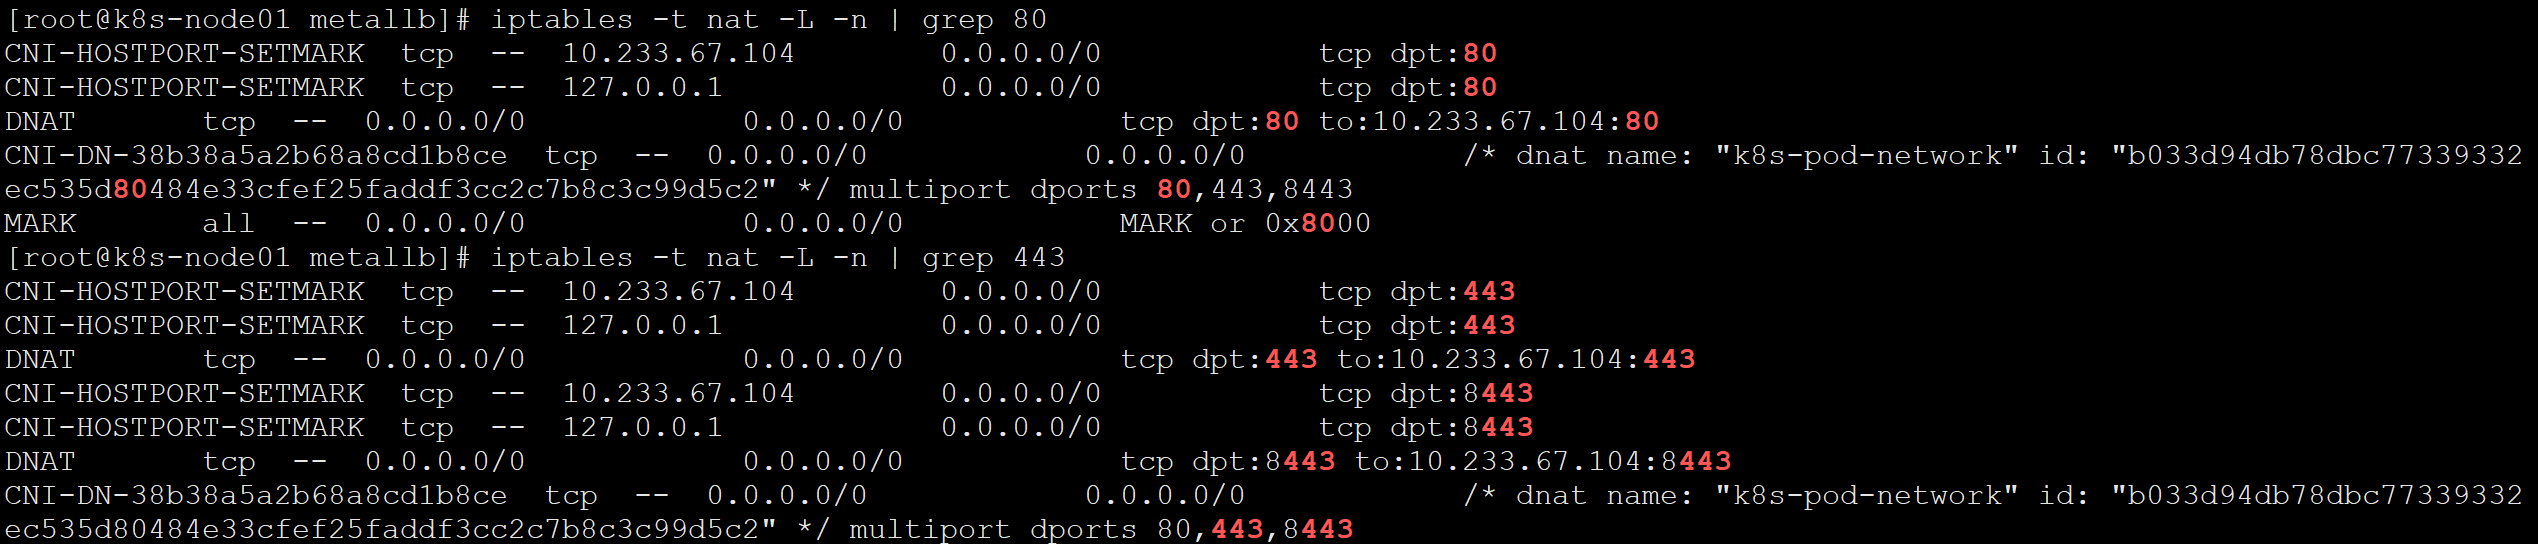
需要注意一下,可能本地集群部署,没有负载均衡,所以ingress-nginx开启了hostNetwork: true和hostPort: 80,直接在node节点上监听了80端口,但是如果开启了hostNetwork: true,sidecar容器是注入不了的。
所以这里可以把hostNetwork: true去掉,只保留hostPort: 80,这样iptables会创建规则,把流量转到k8s集群内的pod,还是可以使用node节点的80端口,又可以注入sidecar容器。
或者使用metallb负载均衡器,这里不再赘述,metallb部署可以看我另一篇文章。
使用Istio
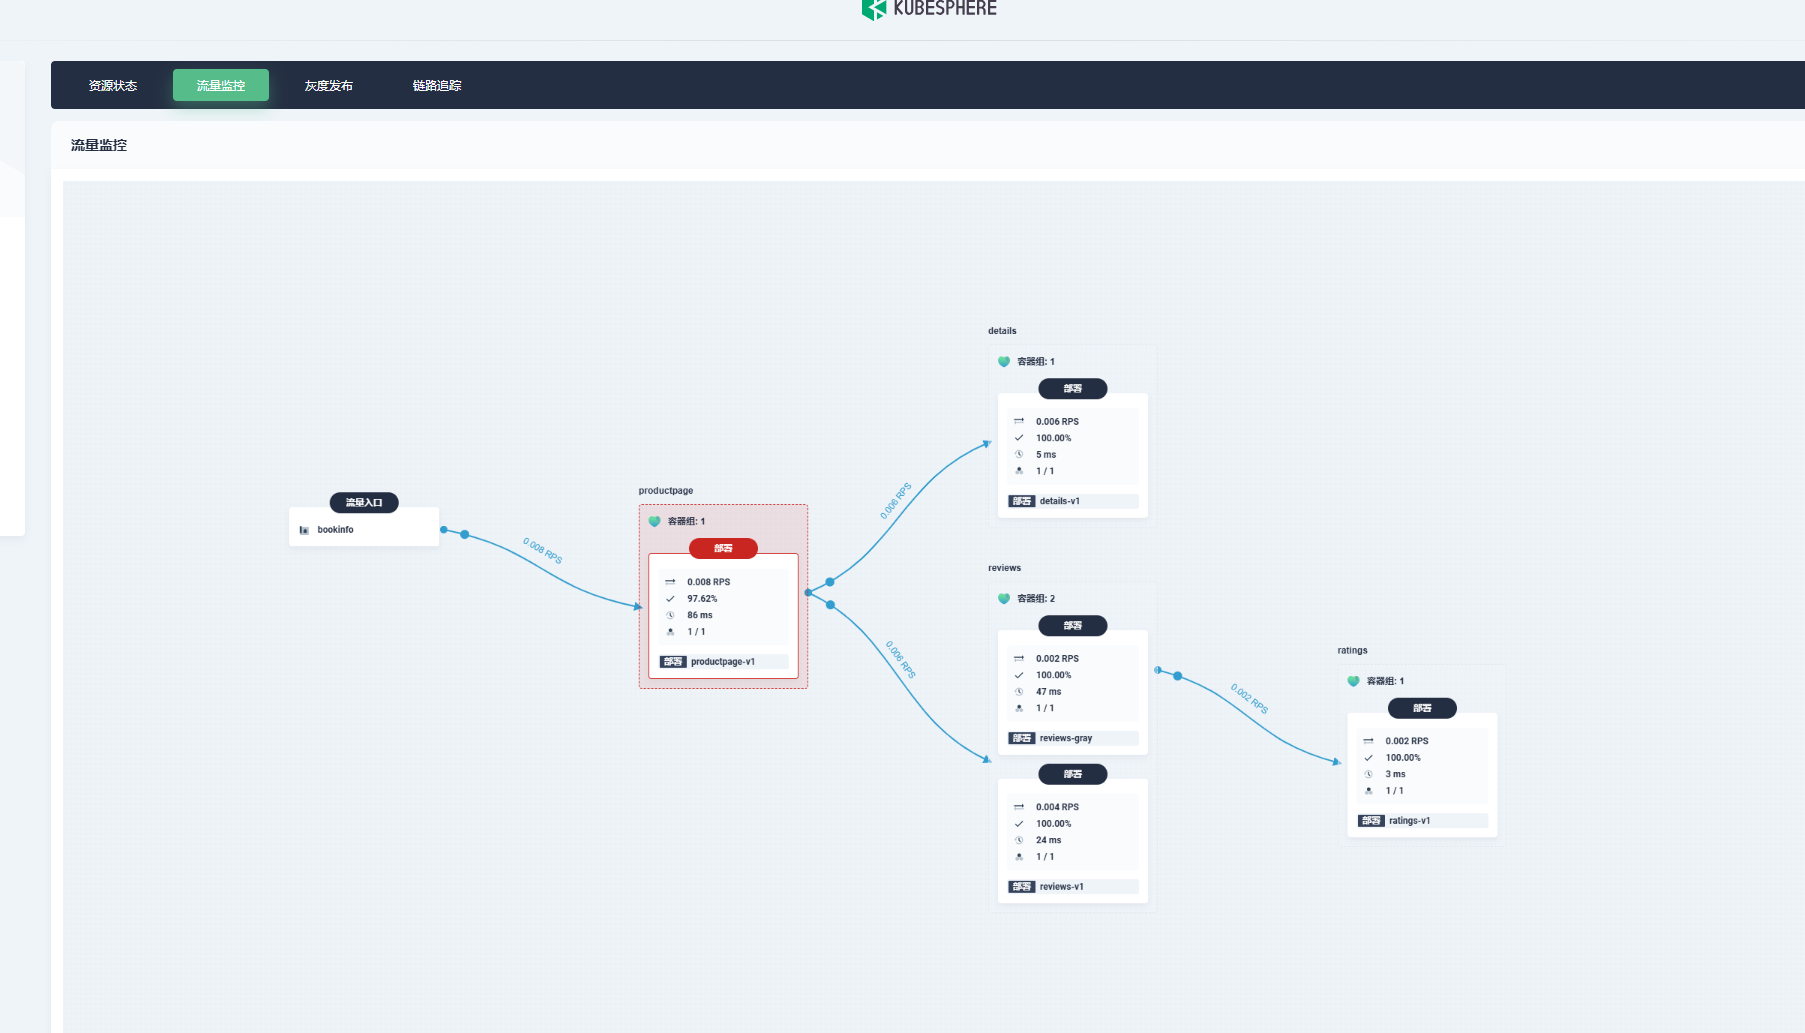
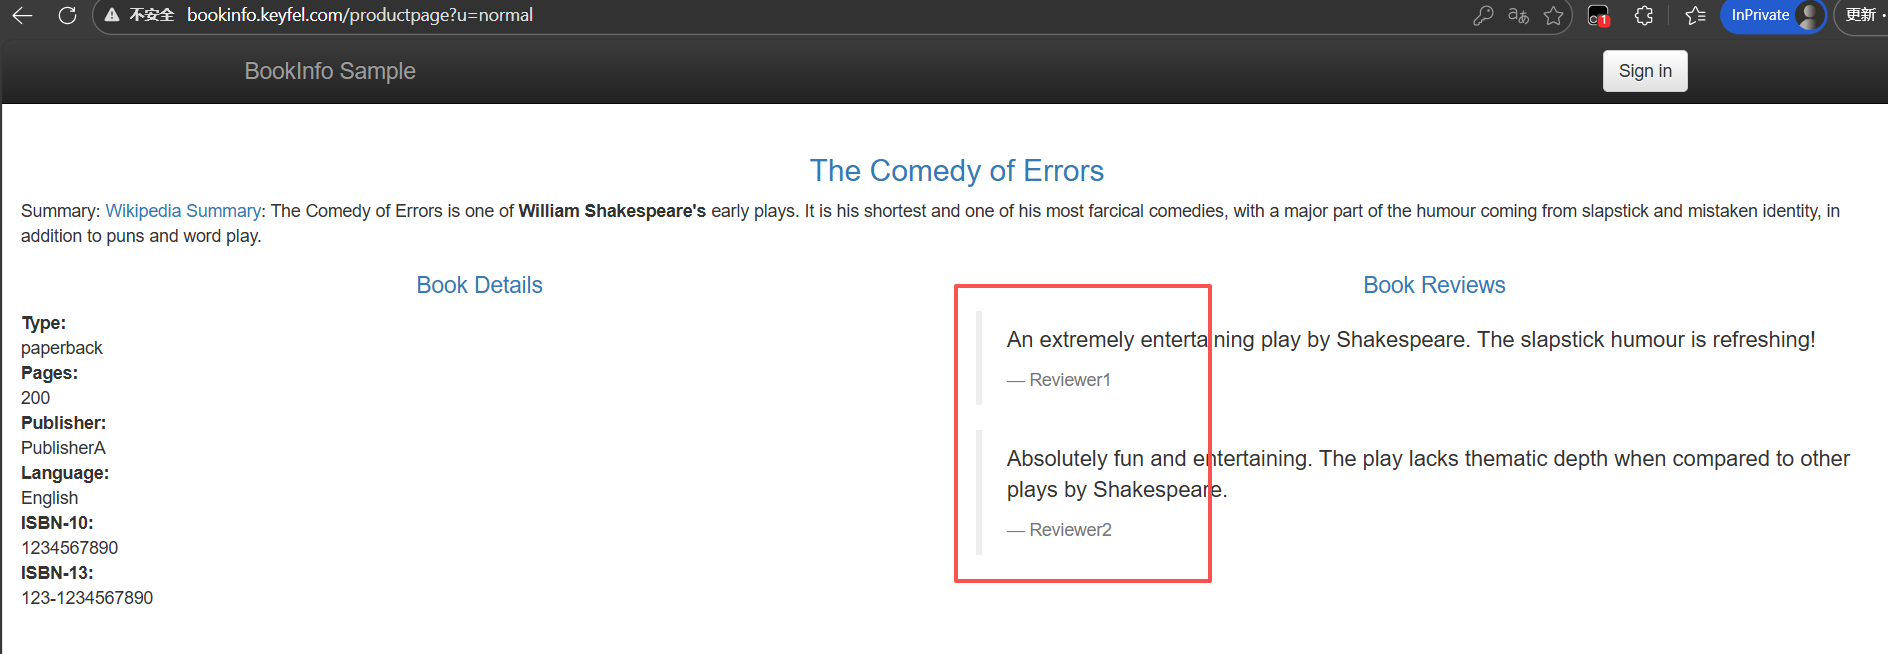
部署实例应用bookinfo演示Istio功能

部署完成:

可以点击流量监控查看拓扑图:
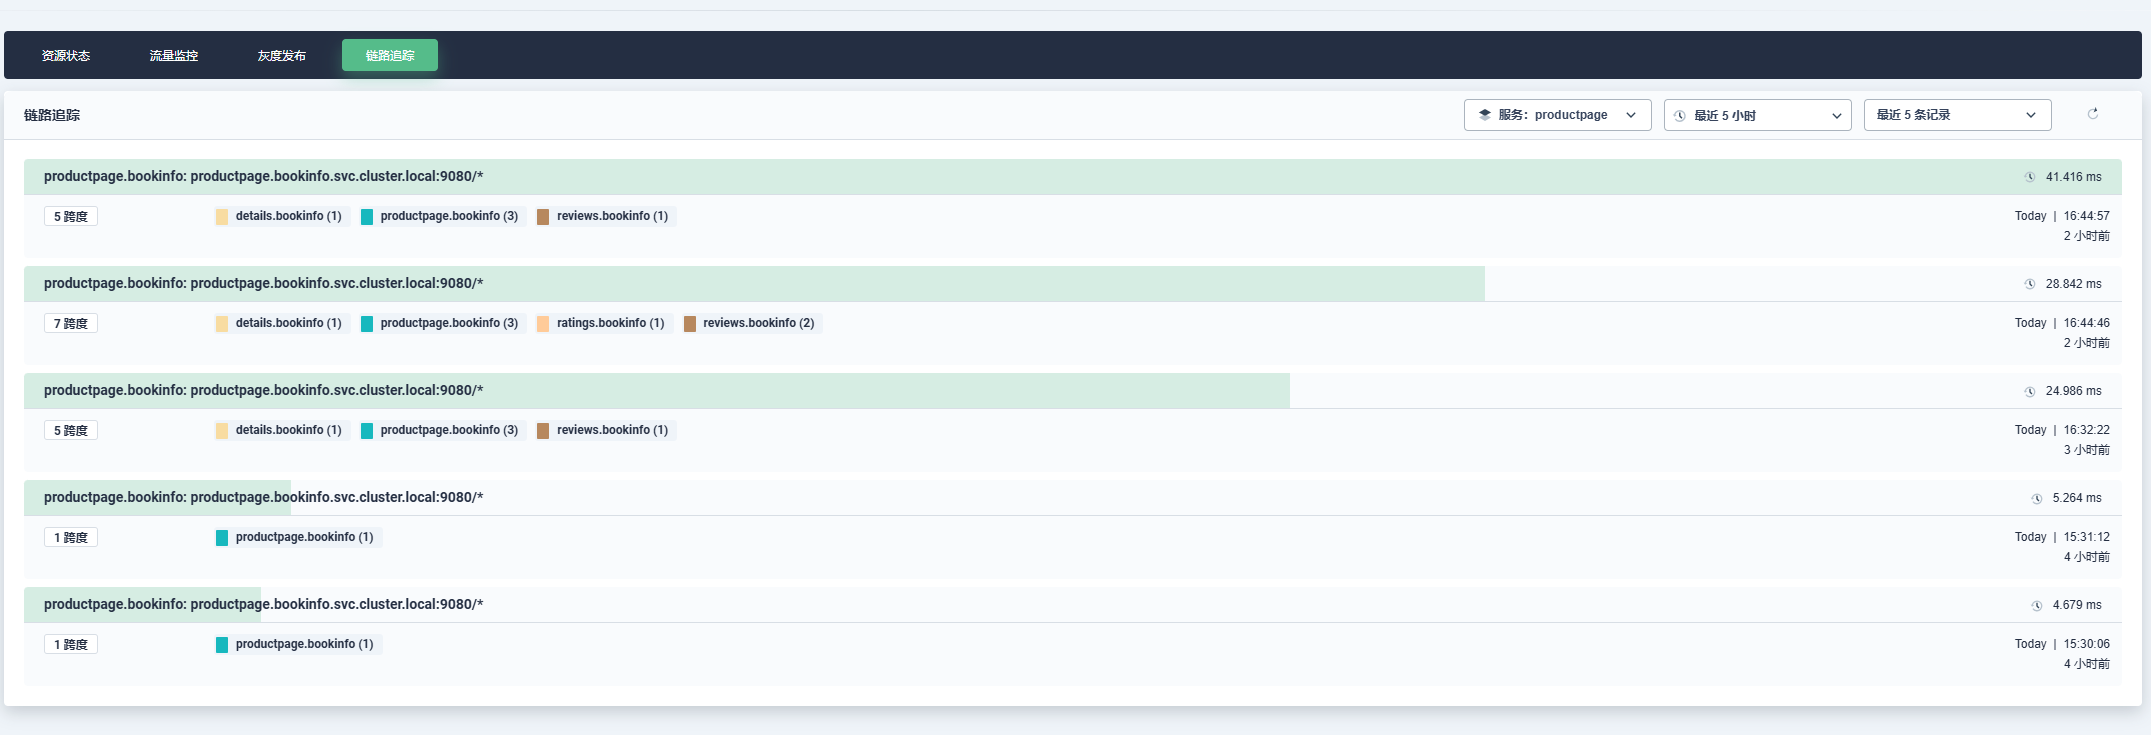
以及链路追踪:
熔断功能:
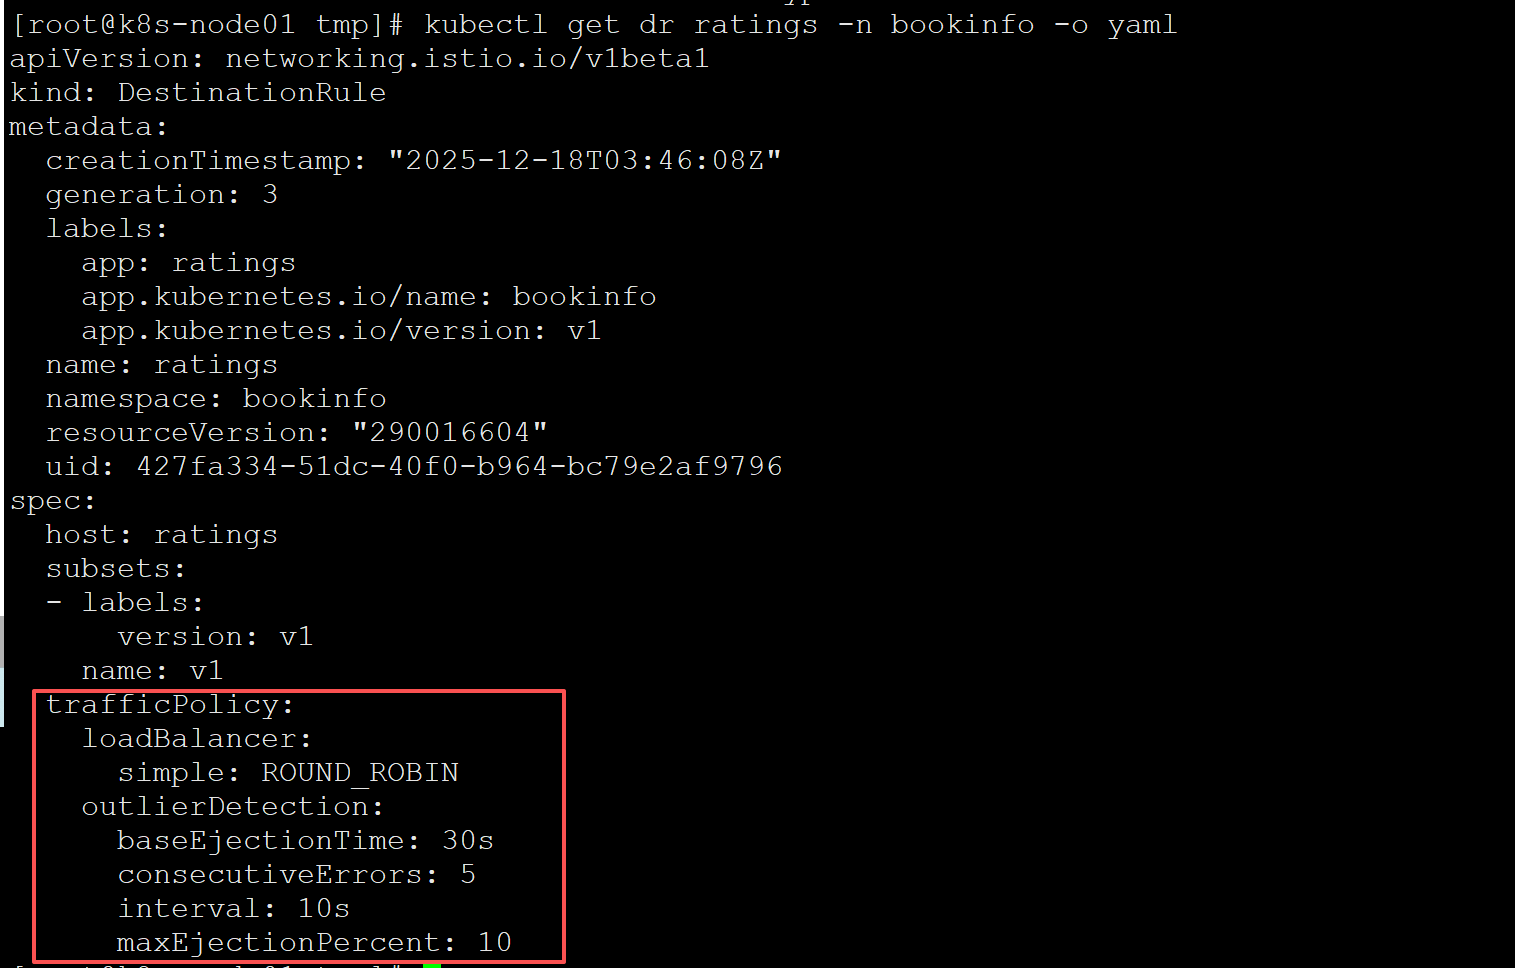
点击具体的微服务,右边有个流量管理,我们点击启用熔断器,确认就可以使用熔断功能,会自动更新相关的VirtualService和DestinationRule:

查看DestinationRule:
金丝雀发布
点击灰度发布,选择金丝雀发布:


选择哪个微服务需要灰度发布:

配置要灰度的版本信息:
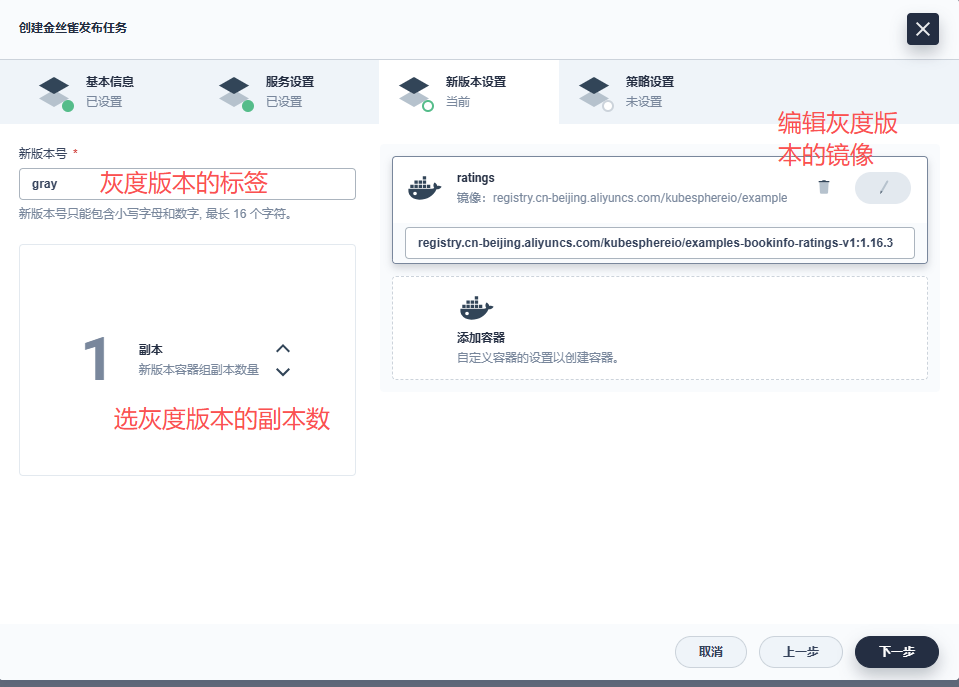
配置灰度策略:
按比例或者指定参数:

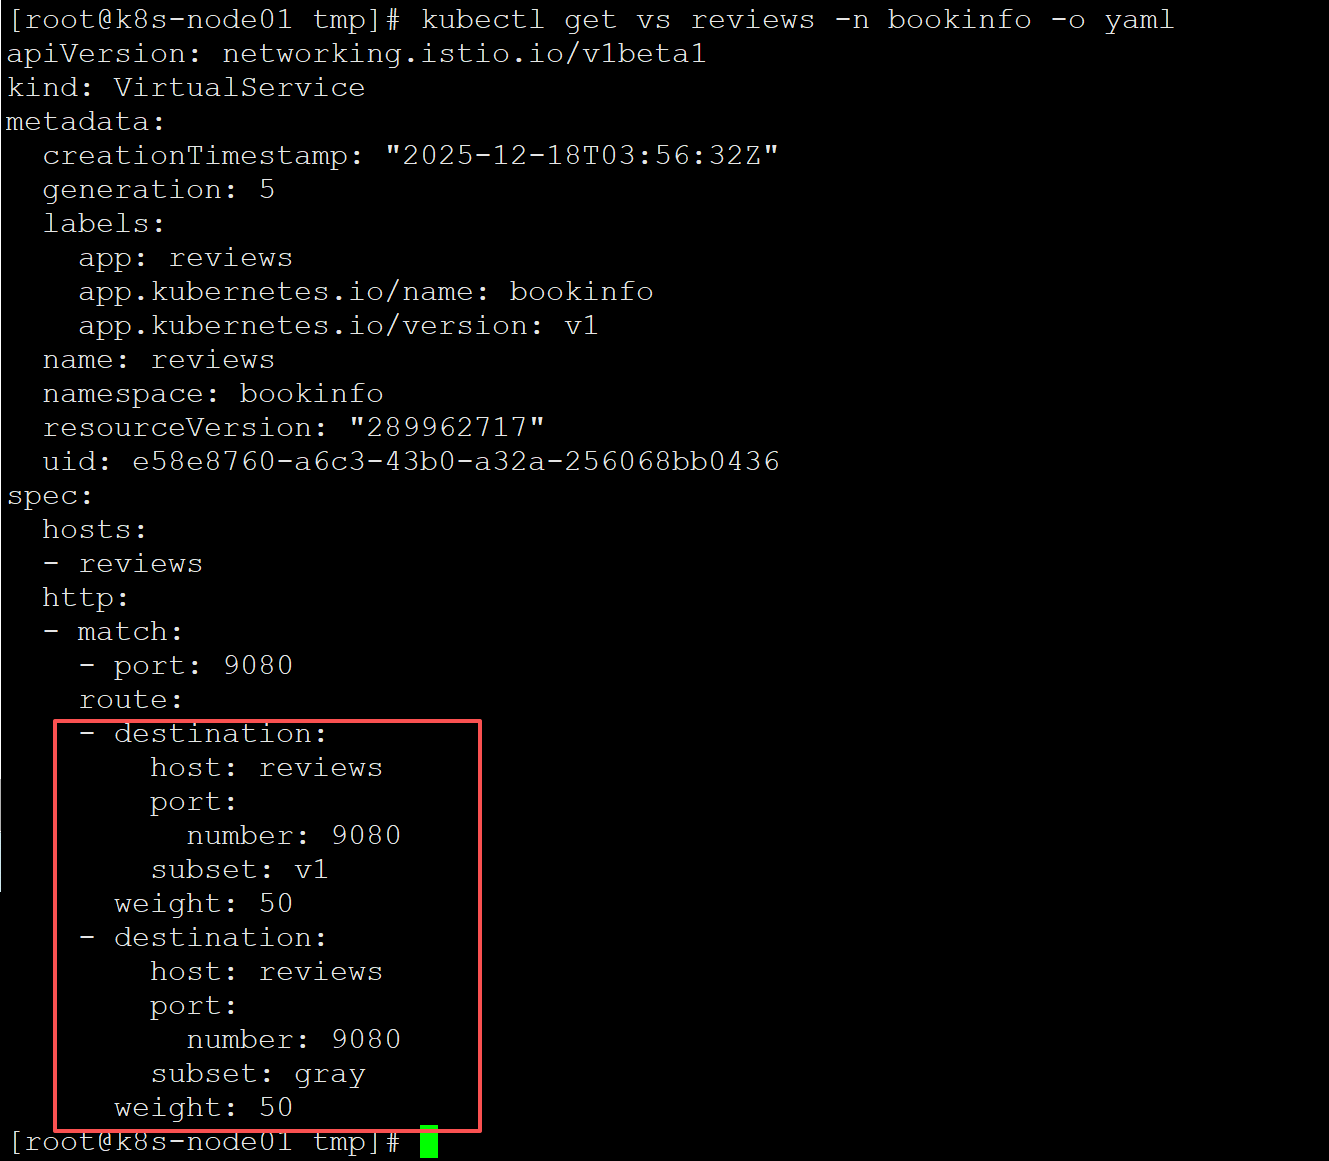
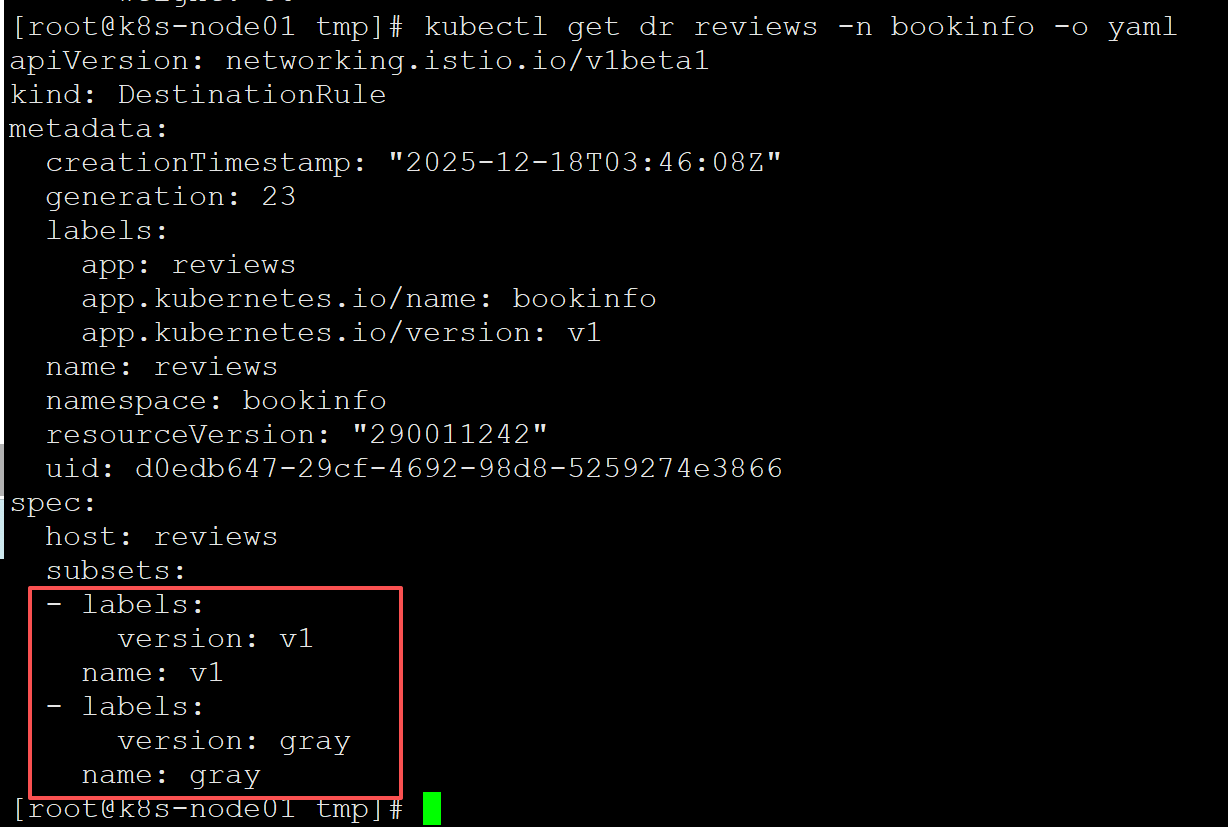
创建完发布任务之后就灰度版本就发布了,VirtualService和DestinationRule会自动调整,可以查看验证一下:
VirtualService:
DestinationRule:
验证灰度结果:
刷新可以看到两个版本在切换:
v1版本:
gray版本:

回到控制台,点击发布任务:

可以点进去查看当前版本和灰度版本的流量,请求成功率等等信息,以及调整灰度比例:
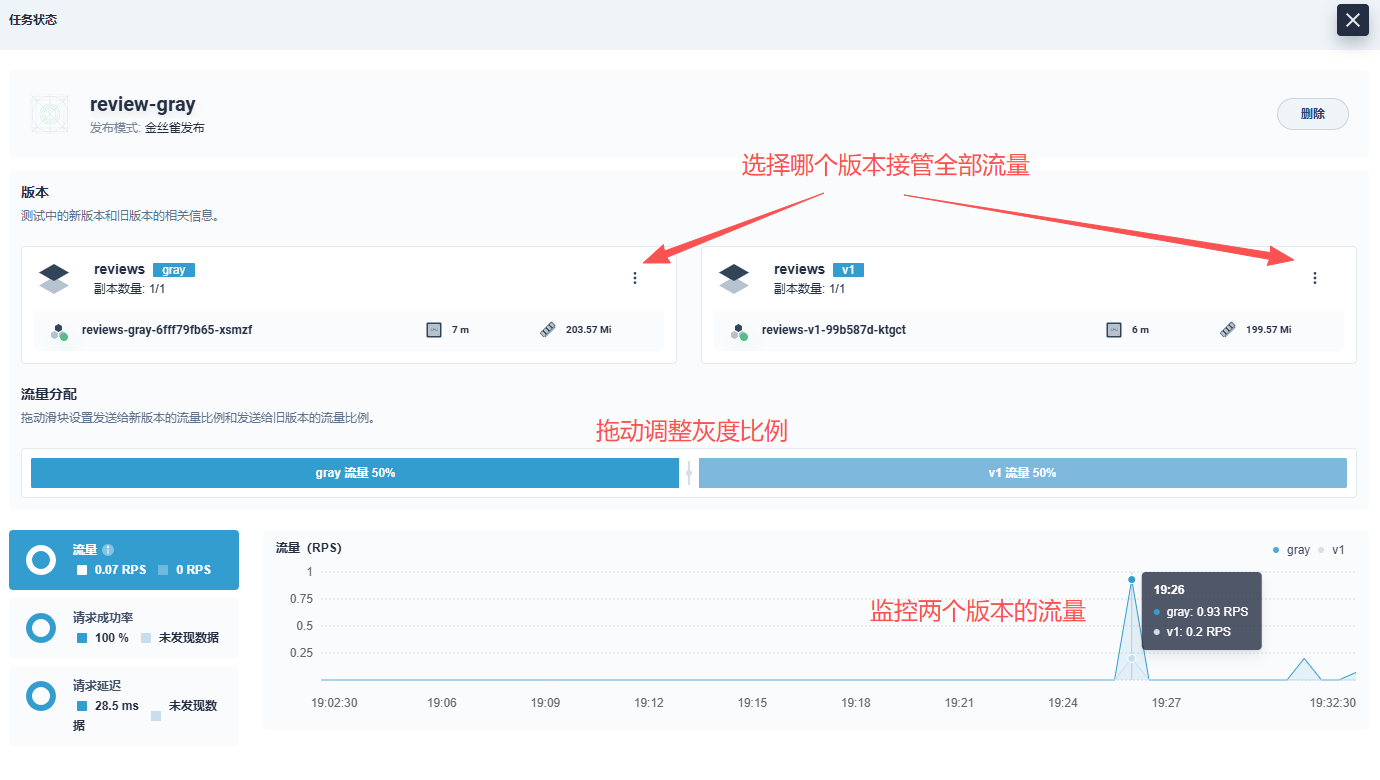
灰度版本有问题的话可以回滚到v1版本,灰度版本验证没问题需要全量发布的话可以选择gray版本接管流量。
因为直接用灰度版本去接管全部流量的话,每次灰度发布都会创建不同的deploy,因为我的CI/CD用jenkins发布,写死了deploy的名称,所以我的做法是验证完灰度版本没问题,先把gray版本接管所有流量,然后把v1版本的镜像改为灰度版本的镜像,等容器启动完之后,现在两个版本都是gray版本的镜像,再把v1版本接管所有流量,然后再把发布任务删除(必须要有一个版本接管全部流量之后才删的了灰度发布任务),这样也就相当于是gray版本全量发布了。
删除灰度发布任务后,非接管流量的那个版本对应的deploy等等资源也会自动删除。
按需注入sidecar
如果微服务很多,每个微服务都注入sidecar容器的话,会有性能损耗,有延迟,需要的服务器资源也多,所以我们可以按需注入sidecar容器,需要灰度发布的微服务就注入sidecar,不需要的就不注入,不注入的话请求就是k8s默认的负载均衡。
但是要注意不能使用mTLS,使用mTLS的话,没注入sidecar容器的都会通信失败,且如果被调用方需要灰度,那么被调用方和调用方都需要注入sidecar,规则才能生效。
即:
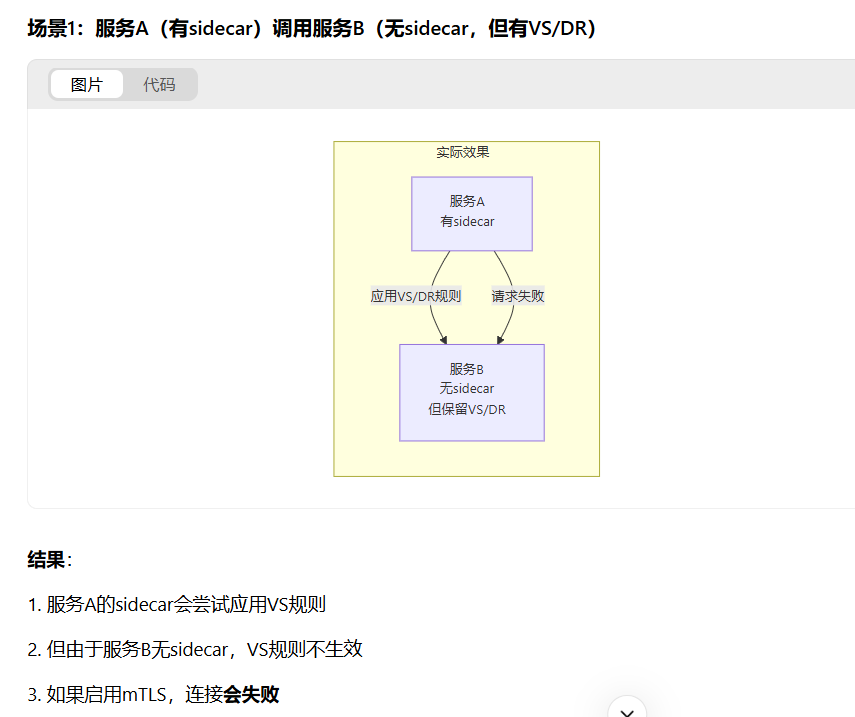
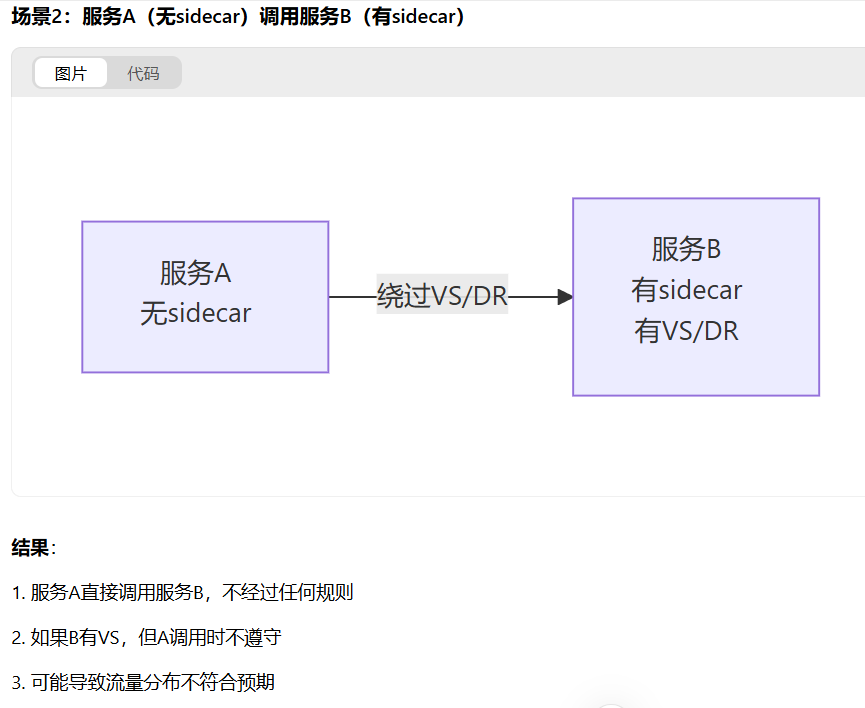
所以如果你的微服务相互间都有调用的话,那还是需要都注入sidecar,规则才能生效。
使用Istio遇到的问题
nacos注册
微服务注入Sidecar后服务注册到Nacos不稳定,时有时无。
解决办法:
nacos的headless svc的9848,9849端口加上appProtocol: tcp
1 | kind: Service |
参考文档资料:
1.https://github.com/alibaba/nacos/issues/10141
2.https://github.com/nacos-group/nacos-k8s/issues/221
3.https://istio.io/latest/docs/ops/configuration/traffic-management/protocol-selection/
tcp探针健康检查失败
Istio官网提出:
TCP 探针检查需要特殊处理,因为lstio 将所有传入的流量重定向到 Sidecar,所以所有TCP 端口都显示为开放。kubelet仅检查某个进程是否正在监听指定的端口,因此只要 Sidecar 正在运行,该探针就总会成功。
所以即使pod主容器还没启动完成,pod也会显示就绪。
解决办法是使用httpget探针检测,我用的Istio版本是1.11.2,此问题在1.12.0已修复,或者升级Istio。
nacos访问失败
nacos服务也是k8s集群里跑的,通过Ingress访问,Ingress-nginx注入sidecar后,发现访问nacos报404.
解决办法:
nacos的Ingress添加注解nginx.ingress.kubernetes.io/upstream-vhost: $svc.$ns.svc.cluster.local
但是又出现新的问题:
Ingress添加注解nginx.ingress.kubernetes.io/upstream-vhost后,浏览器访问不是根路径时,重写路径会
导致浏览器访问会跳转到k8s集群内部的值: $svc.$ns.svc.cluster.local,从而访问失败。
解决办法:
方法一:
下游服务是nginx时,可修改nginx配置:
1 | location /system { |
方法二:
修改Ingress,加上以下注解,重定向:
1 | kind: Ingress |
一个Ingress多个路径怎么配置注解
可能有一个Ingress不同路径路由到不同服务的情况,但是ingress-nginx注入sidecar之后,需要添加注解nginx.ingress.kubernetes.io/upstream-vhost,只有一个值匹配不了多个服务,所以我们需要把多个服务拆解为多个ingress管理。
Ingress-nginx获取不到真实IP
Ingress-nginx注入sidecar后日志获取到的来源IP全部为127.0.0.6,无法获取真实IP(前端传入的X-Forwarded-For中的IP被覆盖)。
解决办法:
1.ingress controller的cm中加上如下data:
1 | use-forwarded-headers: "true" |
然后重启这个pod,发送测试请求:
1 | curl -H "X-Forwarded-For: 1.2.3.4" http://your-domain.com |

查看ingress-nginx日志:
1 | kubectl logs -f deployment/ingress-nginx-controller -n ingress-nginx |

发现已经可以透传Header中的外部IP。
然后添加以下envoyfilter:
1 | kubectl apply -f - <<EOF |
发现可以正常获取真实IP了: