在k8s中配置启用了istio之后,在创建pod之后会自动注入一个Envoy这样的容器,可理解为代理容器,也就是说,创建pod是除了定义的一个主容器,还会在启动istio之后自动注入一个容器,一个pod有两个容器,该代理容器主要是用来做流量的控制和管理,能做到流量的拦截,能控制熔断、超时、重试,按流量的百分比代理等作用。
流量管理
熔断
当在 K8s集群中使用 Istio 时,可以通过 Istio 提供的熔断功能来增加微服务架构的稳定性和可靠性。
熔断是一种故障保护机制,用于在服务之间的通信中防止故障扩散,并提供更好的容错能力。
在微服务架构中,一个应用通常由许多小型的、相互协作的服务组成。当某个服务发生故障或变得不可用时,如果不采取措施,可能会导致连锁反应,影响到整个系统的可用性。
熔断机制旨在解决这个问题,其核心思想是在服务之间设置阈值和超时时间,并对请求进行监控。当服务的错误率或响应时间超过预设的阈值时,熔断器会打开,拒绝向该服务发送更多请求,并快速失败返回错误,而不是等待超时。
应用场景如下:
1 | 1.快速失败返回: |
超时
在 K8s集群中结合 Istio,可以使用 Istio 的流量管理功能来控制服务之间的请求超时。
超时是指在一定时间内,如果某个请求没有得到及时响应,就会被认为是超时。
通过设置请求超时时间,可以对服务之间的通信进行控制,确保请求在合理的时间内得到响应,避免请求无限期地等待导致资源浪费或影响整体系统的响应性能。
Istio 的超时控制允许你为每个服务之间的请求设置最大的等待时间。
当某个请求在指定的超时时间内没有得到响应时,Istio 会终止该请求并返回一个错误响应给客户端。
这样可以防止请求在后端服务长时间等待,从而避免请求积压,同时提高系统的稳定性和可用性。
超时控制的意义如下:
1 | 1.防止长时间等待: |
Istio组件
pilot
Pilot 是 Istio 控制平面的组件,在istio系统中,Pilot 完成以下任务:
它从服务注册中心(如Kubernetes的etcd或Consul)获取服务和实例的信息,并为Envoy生成配置,Envoy 根据 Pilot 发过来的配置里的内容,完成具体流量的转发。
Pilot可以被认为是团队的领袖。它负责监督和指导队伍中的每个Envoy。
Pilot指导整个团队中每个服务的位置,以及它们应该如何相互协作。
当有新队员加入或者队员的位置变化时,Pilot会负责通知每个队员,确保大家都知道最新的情况,不会出现迷路或者错过重要信息,会把要做的事形成文件下发到每个envoy队员里。
envoy
Envoy是Istio中的代理,我们如果开启了istio功能,会在pod里自动注入Envoy代理容器,它负责处理服务之间的所有网络通信,拦截并转发所有的HTTP、TCP和gRPC流量。
Envoy提供强大的流量控制和管理功能,如路由、重试、超时和故障注入等。
Envoy和主容器同属于一个Pod,共享网络和命名空间,Envoy代理进出Pod 的流量,并将流量按照外部请求的规则作用于主容器中。
Envoy可以看作是服务之间的守护者。它像一个中间人一样,坐在每个服务旁边(就像每个队员身边都有一个保镖一样)。它负责处理服务之间的所有信息传递,确保信息传送得又快又准确。如果有请求从一个服务发出,Envoy会帮它找到正确的目标服务并将请求送达过去。它还能处理各种不同类型的请求,就像精通各种语言的翻译一样。
galley
Galley是Istio的配置管理组件,负责验证、转换和分发配置给其他Istio组件。
它监听Kubernetes的配置更改,例如Service、Deployment等,然后根据规则和策略生成Istio所需的配置,并将其提供给Pilot和其他组件。
Galley可以被看作是团队中的文件管理员。它负责管理团队中所有的文件和信息,确保每个队员都能得到正确的信息和文件。当有新的文件产生或者文件发生变化时,Galley会及时通知团队中的每个成员,确保大家都使用的是最新的文件,不会出现信息不同步的问题。
Ingressgateway
istio-ingressgateway是Istio服务网格中的一个特殊网关,它作为整个网格的入口,接收外部请求,并将它们引导到内部的服务。
可以将它比作一个大门保安,负责接收外部人员的访问请求,然后根据配置的规则将请求分发给网格内部的服务。
简单来说,当有外部的请求访问Istio服务网格时,它们会先被送到istio-ingressgateway。
这个网关会检查请求,并根据一些规则判断该请求应该交给哪个服务来处理。
然后,它将请求转发给网格内部的相应服务,从而实现外部请求与内部服务的连接。
egressgateway
istio-egressgateway是Istio服务网格中的另一个特殊网关,它负责处理网格内部服务对外部服务的访问请求。
可以将它看作是一个网格内部的出口,负责将内部服务需要访问的外部服务请求发送到外部。
以将istio-egressgateway比作一个秘书,它会代表网格内部的服务,帮助它们联系外部的服务。
当网格内部的服务需要访问外部服务时,它们会将请求交给istio-egressgateway,然后由这个网关将请求发送给外部服务。
安装/卸载istio
当安装完成istio之后,就会自动生成三个pod,分别为:istiod、Ingressgateway、egressgateway,然后就可以使用它的熔断、超时、重试等功能。
1 | 注意: |
k8s集群小于等于1.23版本安装istio
k8s集群版本:1.23.1
下载istio的安装包:
官网下载地址:GCS browser: istio-release
这里使用的版本是istio:1.13.1 (可使用wget 下载)
1 | wget https://gcsweb.istio.io/gcs/istio-release/releases/1.13.1/istio-1.13.1-linux-amd64.tar.gz |
1 | #下载到k8s集群的master节点并解压 |
k8s集群大于等于1.24版本安装istio
k8s集群版本:1.28.1
下载istio的安装包:
官网下载地址: GCS browser: istio-release
这里使用的版本是istio:1.182 (可使用wget 下载)
1 | wget https://gcsweb.istio.io/gcs/istio-release/releases/1.18.2/istio-1.18.2-linux-amd64.tar.gz |
1 | [root@k8s-master ~]# tar -zxvf istio-1.18.2-linux-amd64.tar.gz |
安装命令选项
1 | istioctl install --set profile=demo -y |
通过如下命令可以看到选择安装的模式下都有哪些配置文件
如查看demo模式:
1 | istioctl profile dump demo |
配置外部ip
安装完之后由于我们没有负载均衡的环境,所以EXTERNAL-IP一直是pending的状态
1 | kubectl svc istio-ingressgateway -n istio-system |

我们可以直接用节点ip+nodeport的方式访问,但是如果我们想要直接用域名访问,不在后面加nodeport的话,需要配置EXTERNAL-IP。
可以安装MetallLB,或者直接在svc里指定EXTERNAL-IP,这里我简单演示,就直接指定EXTERNAL-IP。
EXTERNAL-IP要和节点ip在同一个网段,我的局域网IP段是10.168.2.0/24
1 | kind: Service |
修改完之后再查看,EXTERNAL-IP已配置:
1 | kubectl svc istio-ingressgateway -n istio-system |

这个其实是通过kube-proxy去转发流量,也就是iptables规则(kube-ipvs):

现在把域名解析到这个EXTERNAL-IP就可以通过域名访问,而不需要在后面加nodeport。
卸载istio
1 | #该卸载方式会保留名称空间等一些组件遗留 |
k8s集群部署在线书店,启用istio
使用istio自带的工具进行部署,如下步骤中的yaml文件都在解压istio压缩包中自带的。
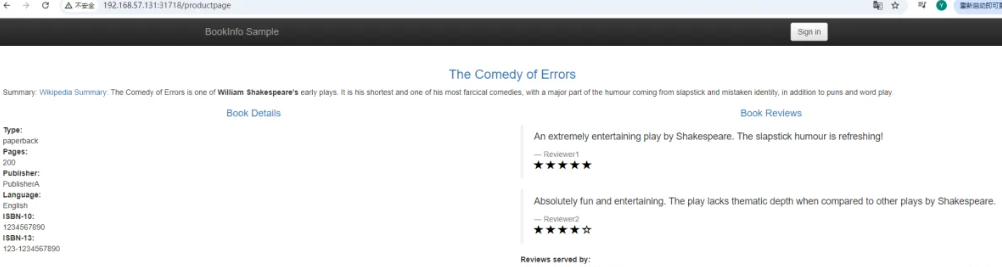
在线书店(Bookinfo)应用分为四个单独的微服务
1 | 1)productpage这个微服务会调用details和reviews两个微服务,用来生成前端页面; |
reviews微服务有3个版本
1)v1版本不会调用ratings服务;
2)v2版本会调用ratings服务,并使用1到5个黑色星形图标来显示评分信息;
3)v3版本会调用ratings服务,并使用1到5个红色星形图标来显示评分信息。
配置istio自动注入代理容器功能
部署应用前还需要为默认名称空间打上一个标签,可理解为开启istio自动注入代理容器功能。
因为下面步骤创建的pod等资源都在默认名称空间下创建,所以为默认名称空间打赏标签,
istio默认自动注入 sidecar,需要为default命名空间打上标签 istio-injection=enabled,这样在默认空间下创建pod istio就可以自动注入一个代理容器。
注:在别的名称空间创建pod时,要想istio自动注入代理容器,也要打上相同的标签
1 | #打标签 |
关闭 istio自动注入代理容器功能
如上所示,要想关闭istio自动注入代理容器功能,则需要将istio-injection=enabled该标签从名称空间上取消。
为了不影响下方的实验,该步骤功能了解即可,不用操作。
1 | #删除标签 |
部署应用
如下步骤使用的集群版本为1.28.1,容器运行时使用的是containerd
准备如下镜像到k8s集群的工作节点中
(不准备也可以,直接使用istio自带的yaml文件时也会自动下载)
1 | /istio/examples-bookinfo-details-v1:1.17.0 |
1 |
|


访问验证
1 | #访问上面bookinfo-gateway.yaml文件中gateway资源中指定的具有istio=ingressgateway标签的pod的前端service |
通过Istio实现灰度发布
灰度发布也叫金丝雀部署 ,是指通过控制流量的比例,实现新老版本的逐步更替。
比如对于服务A 有两个版本 , 当前两个版本同时部署, 控制流量的访问版本1比例90% ,访问版本2比例10% ,然后根据运行的效果逐步调整流量访问占比,直至最终版本1下线。
工作节点准备两个镜像进行测试实验:
这里使用的是nginx镜像,该镜像服务状态均一致,只是版本不同,用于测试灰度发布
nginx-v1 返回版本1
nginx-v2 返回本本2
创建pod
1 |
|
创建service
创建service代理两个pod:
1 |
|
创建Gateway
使用Gateway,通过istio的ingressgetway这个service,根据它映射的物理机端口31718,通过访问k8s集群节点的IP+31718,将请求交给到刚刚创建的pod前端的四层代理service,然后最终再通过这个四层代理service访问到它代理的后端pod。
istio的ingressgetway这个service的物理机映射端口如下图所示:

1 | [root@k8s-master ~] |
如果要配置https证书的话,修改如下(需要先申请证书,再引用):
注:生成的证书需要和ingress-gateway在同一个namespace
1 | apiVersion: /v1beta1 |
创建虚拟服务VirtualService
定义访问流量的比例:
1 | [root@k8s-master ~] |
创建目标规则
创建上方virtualService的yaml文件中定义的子级指向规则:
1 | [root@k8s-master ~]# vim istio-pod-vlbetal-destination.yaml |
逐步增加 v2 版本的流量比例
如果 v2 版本运行稳定,我们可以逐步增加其流量比例。修改 istio-pod-vlbetal.yaml 文件中的 weight 值,例如将 v1 的权重设置为 50,v2 的权重设置为 50,然后使用 kubectl apply -fistio-pod-vlbetal.yaml命令更新配置。
高级灰度策略
除了简单的流量比例切分,Istio 还支持更高级的灰度策略,例如:
- 基于用户 ID 的灰度: 将特定用户 ID 的流量路由到新版本。
- 基于 HTTP Header 的灰度: 根据 HTTP Header 中的特定字段,将流量路由到新版本。
- 基于 Cookie 的灰度: 根据 Cookie 中的特定字段,将流量路由到新版本。
这些高级策略可以帮助我们实现更精细的灰度发布,例如只让内部员工或特定用户体验新版本。
以下是一个基于 HTTP Header 的灰度示例:
1 | # productpage-virtualservice-header.yaml |
istio的核心功能
熔断
熔断的目的是在出现故障或异常情况时,对服务进行自动的限流和隔离,以保护整个系统的稳定性和可用性。
首先创建一个pod服务进行熔断测试。
1 | #参考使用istio自带的yaml文件 |
配置熔断规则
对上方创建的pod服务进行配置熔断规则:
1 | [root@k8s-master ~] |
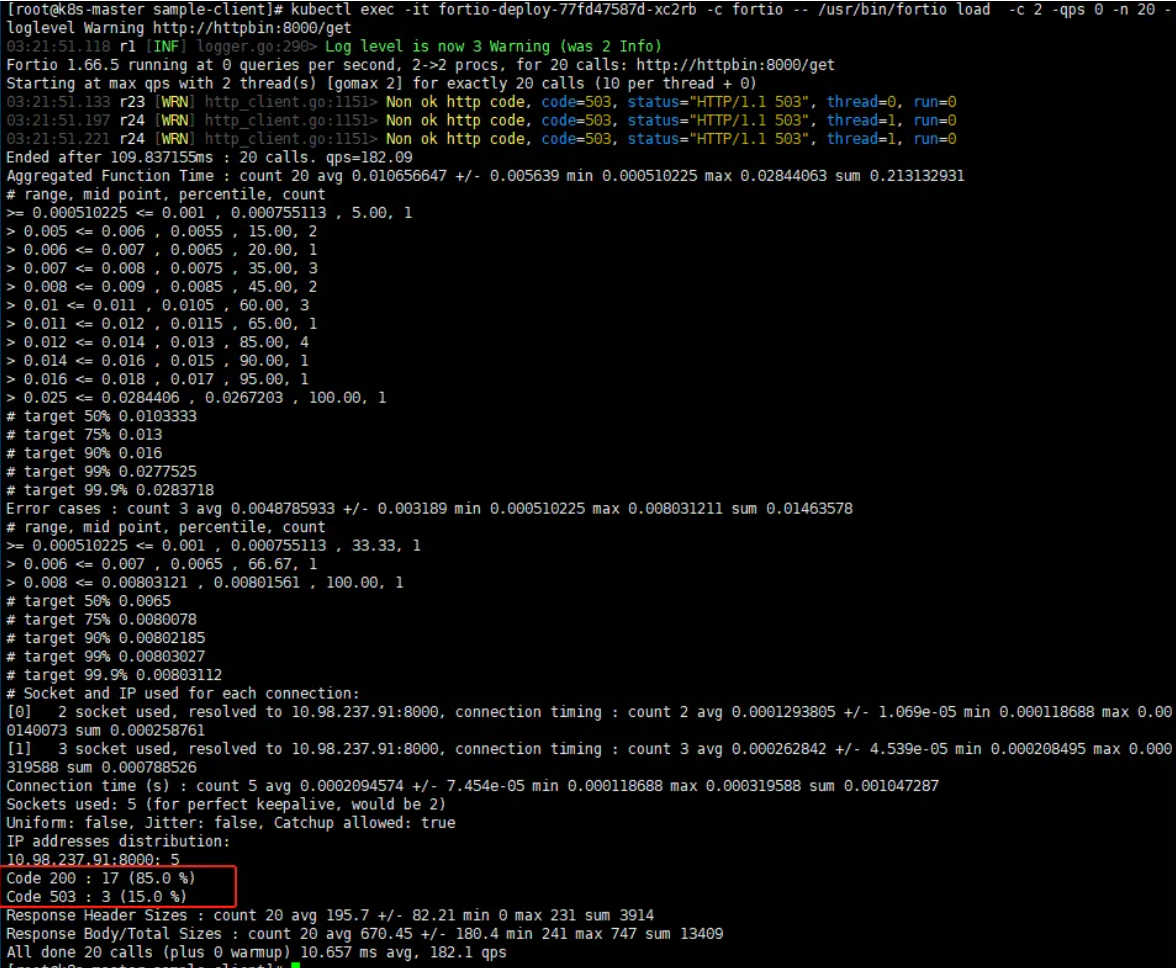
创建客户端模拟请求
使用istio工具自带的yaml文件创建一个客户端进行模拟访问httpbin pod服务,从而测试熔断的规则是否生效。
该pod中运行的服务是fortio,fortio是专门对网站进行压测的。通过该工具调用httpbin服务从而测试熔断规则。
创建fortio
1 | #进入到目标路径 |
模拟访问请求
1 | #测试请求一次,如下显示正常 |
1 |
|
超时
在多台服务器互相请求时为了避免等待的响应时间过长,从而堆积大量的请求阻塞了自身服务,造成雪崩的影响,这种情况下可以可以使用istio的“超时”功能。
如A服务,请求B服务,可以设置超时等待时间,如请求时超过了这个设置的等待时间,那么将不再等待请求,直接返回请求超时错误。
创建测试超时使用的pod
这里使用了nginx、tomcat镜像创建pod,并创建svc代理这两个pod。
1 |
|
配置超时
1 | #创建pod |
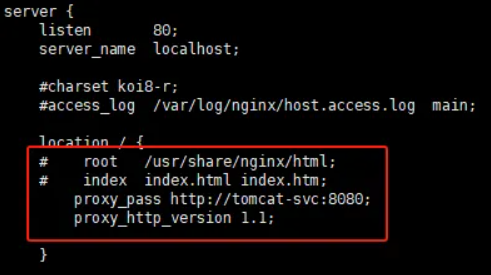
nginx配置反向代理tomcat
1 | #进入到nginx pod配置反向代理,将nginx请求代理到tomcat |
测试超时规则
这里使用了busybox镜像运行pod去访问nginx测试超时规则是否生效。
1 | [root@k8s-master ~]# kubectl run busybox --image=busybox --restart=Never --rm -it --image-pull-policy=IfNotPresent -- sh |
故障注入和重试
“重试”,顾名思义,当第一次连接失败之后,可以根据配置的重试规则次数,在连接失败之后重新连接几次
根据上方测试”超时“时使用的nginx代理tomcat为例,测试“故障注入和重试”:
1 | #因为需要配置“重试”规则,需要将上方测试“超时”时创建的VirtualService资源删除 |
配置重试规则并注入故障规则
1 | #配置重试规则 |
测试重试规则
继续使用busybox镜像进行访问测试:
1 | [root@k8s-master ~]# kubectl run busybox --image=busybox --restart=Never --rm -it --image-pull-policy=IfNotPresent -- sh |

Istio网关额外配置
IP黑白名单
当服务受到攻击,或者只允许服务在某些 IP 下才可以访问的时候,通常的做法是为服务加上 IP 黑白名单。
在配置好Gateway,virtualservice后可以从集群外访问集群内的服务,如果想限制特定的IP访问不了可以加入黑名单:
1 | apiVersion: security.istio.io/v1beta1 |
这里,我的 IP 是 38.75.137.213,而在 AuthorizationPolicy 中,设置了 DENY 并指向 httpbin.makeoptim.com。
这时,再次访问 httpbin.makeoptim.com 就会返回 RBAC: access denied,表示已经成功设置了黑名单。
1 | ❯ curl httpbin.makeoptim.com/get |
注:
1.ipBlocks 可以支持单个 IP (e.g. “1.2.3.4”) 和 CIDR (e.g. “1.2.3.0/24”)
2.上面的例子为设置黑名单,白名单就是把 DENY 变成 ALLOW
3.to/operation/hosts 可以指定某些 host,这样可以只对某些服务做黑白名单,而不影响到整个服务网格。
限制请求体大小
对所有 ingressgateway 生效
1 | apiVersion: networking.istio.io/v1alpha3 |
对指定 ingressgateway 生效
1 | apiVersion: networking.istio.io/v1alpha3 |